SVG for Cricut: Convert and Create Cut Ready Files in Seconds
Introduction
You found the perfect design: a pumpkin SVG for a fall project, a Bluey SVG or Minnie Mouse SVG for a themed craft, a Minecraft SVG for a birthday decoration, or one of the many Disney SVGs available online. You drag it into Cricut Design Space, and instead of clean cut lines, you see a flat rectangle labeled “Print then Cut.” Or you open an SVG from a marketplace, and the machine tries to slice it into many stray pieces that you never asked for.
This is one of the most common problems crafters face, and it is not really a Cricut issue. Cricut does not care whether an image looks good. It just needs a file with clean vector paths that its blade can follow. A PNG contains only pixels, while a poorly traced SVG may have open paths, overlapping shapes, or a hidden background rectangle. In either case, the machine has nothing reliable to cut.
The solution comes down to two options: convert an image you already have into clean vector paths or create an original design as a vector from the beginning. SVGMaker supports both workflows, helping crafters turn images into cut-ready SVG files or create custom designs for seasonal decorations, personalized gifts, party projects, stickers, vinyl decals, and more. This guide explains what Cricut needs from an SVG, compares the available methods by time and cost, and walks through both approaches step by step
What Cricut Actually Needs From an SVG
Before comparing tools, it helps to know what "cut ready" means in concrete terms. Design Space is looking for five things. When a file fails one of them, the symptom shows up immediately.
| Requirement | Why Cricut needs it | What goes wrong without it |
|---|---|---|
| True vector paths | The blade follows a mathematical outline, not a color grid | The file imports as Print then Cut, or the machine cuts one big rectangle around your artwork |
| Closed shapes | A cut line has to return to where it started | Paths cut halfway and stop, leaving your vinyl attached in places it should not be |
| Fills instead of strokes | Cricut cuts the boundary of a filled shape, not the centerline of a line | Every stroke becomes two cut lines, one on each side, producing thin unusable slivers |
| No full canvas background rectangle | A white rectangle behind the art is a shape, so the blade cuts it | You get a giant square cut around everything, wasting the whole sheet of material |
| Layers grouped by color | Design Space separates layers so each color goes on its own mat | Everything lands on one layer and you cannot split colors without rebuilding the file |
Notice the pattern. None of these are about how the design looks. They are all about structure. That is why a beautiful high resolution PNG is worthless to a cutting machine, and why a plain black silhouette with clean closed paths cuts perfectly.
The white rectangle is worth calling out on its own, because it is the one that catches people who did everything else right. SVG has no background property. If you see white, some tool explicitly draws a white shape into the file, usually a design app exporting its canvas fill. Delete that one element and the problem disappears.
The Five Ways People Get an SVG for Cricut
There are really only five routes. Here is how they compare on the things that actually matter when you have a project to finish tonight.
| Method | Time | Cost | Skill needed | Cut quality |
|---|---|---|---|---|
| Buy on a marketplace | Instant, if it exists | $2 to $8 per file, more for bundles | None | Varies wildly by seller |
| Trace by hand in Inkscape | 30 minutes to 3 hours | Free | Moderate to high | Excellent, if you know node editing |
| Image Trace in Illustrator | 10 to 30 minutes plus cleanup | Subscription | Moderate | Good, but produces heavy path counts |
| Hire a designer | 1 to 5 days | $20 to $150 | None | Excellent |
| AI converter or generator | Seconds | Free tier available | None | Clean closed paths, ready to cut |
The honest read: marketplaces are genuinely the right answer when someone has already made exactly what you want, and you should use them. The problem is that the moment your project is specific, a custom name, a company logo, a drawing your daughter made, no seller has it. That is where the other four routes start, and three of them cost you either a subscription, a skill you do not have, or a week of waiting.
Manual tracing in Inkscape is free and produces great results, but it is genuinely slow work, and the learning curve on node editing is real. Illustrator's Image Trace is faster but tends to output paths with hundreds of unnecessary points, which Design Space chokes on and which cut with visible wobble.
AI conversion collapses the tradeoff. You get marketplace speed on a design nobody sells, without touching a node editor.
Route 1: Convert an Image You Already Have
This is the path for anything that already exists as a picture. A logo, a photo, a screenshot, a scanned drawing, a clipart file, a sticker design.
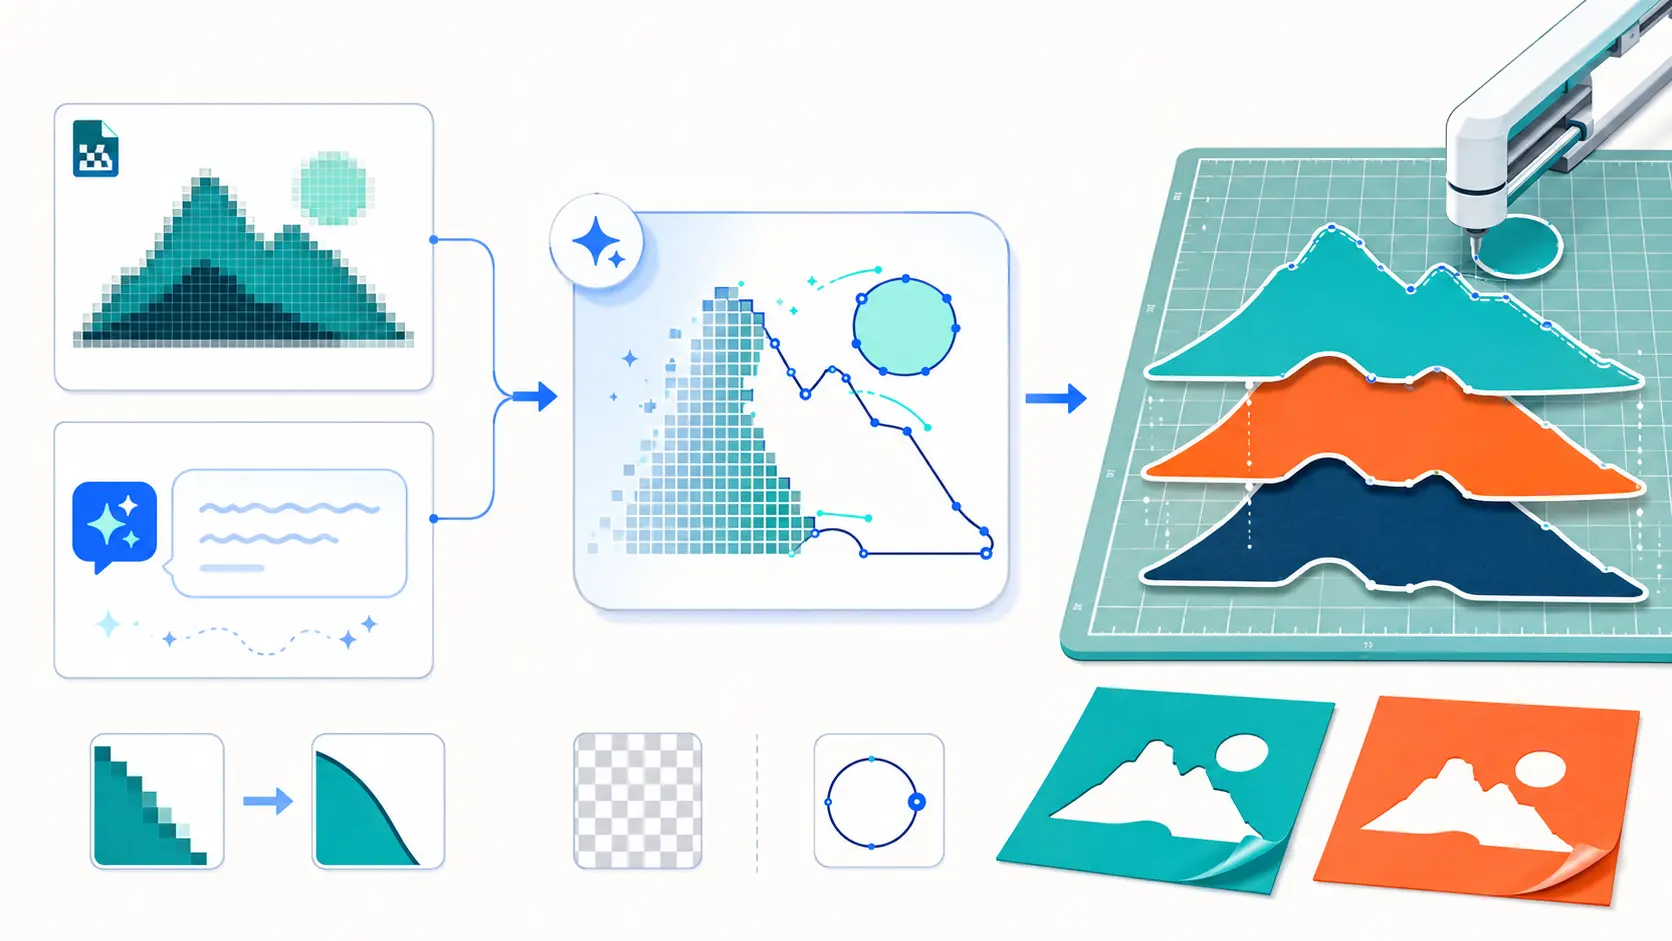
Upload it to the SVGMaker’s AI converter and it comes back as a real vector with closed paths. It accepts PNG, JPG, WebP, and the usual photo formats, so you do not need to convert anything first.
What makes AI conversion different from ordinary tracing
Classic tracing tools work on a threshold. They scan the image, decide which pixels are dark enough to count, and draw an outline around the clusters. That is why traced files come back with jagged edges, speckled noise in shaded areas, and thousands of path points describing what should have been a smooth curve.
AI conversion interprets the image instead of sampling it. It recognizes that a wobbly scanned circle was meant to be a circle, that the gray fuzz around a JPEG logo is compression artifact rather than design, and that two nearly touching strokes were meant to connect. The output is fewer, cleaner, closed paths, which is exactly what a blade wants.
The three steps
- Upload your image.
- Let the converter process it. This takes seconds.
- Download the SVG.
What to check before you cut
Even a clean conversion deserves ten seconds of inspection:
- Drop the SVG over a colored background. If a white box blocks the color, there is a background shape to delete.
- Look at your minute detail. If a line is under about 1/16 inch at your intended cut size, vinyl will tear there. Scale up or thicken it.
- Count your colors. If you want a two color design and the file has six, simplify before you send it to the mat.
Photos are the one case that needs a mental adjustment. A photograph has smooth tonal gradients, and a blade can only cut a hard edge. Converting a portrait works beautifully as a silhouette or a high contrast stencil, not as a literal reproduction. Aim for bold shapes and strong contrast in your source image, and the result cuts cleanly.
Route 2: Create a Design That Does Not Exist Yet
Conversion only helps if you already have the picture. For everything else, generate the vector directly.
With SVGMaker’s AI generator you describe what you want in plain text and get an SVG back, with no raster step in between. Because the output is a vector from the very first moment, there is no tracing quality to lose.
The trick is prompting for cut friendly output rather than pretty output. A prompt that would make a lovely illustration often makes a terrible cut file, because gradients, soft shadows, and hairline detail cannot be cut at all. Ask for what a blade can actually follow:
- "A bold single color silhouette of a mountain range with pine trees, solid fill, no gradients, thick clean outlines suitable for vinyl cutting."
- "A simple two color stencil of a coffee cup with steam, closed shapes only, no thin lines, no shading."
- "A layered floral wreath in three flat colors, each color as a separate layer, no overlapping thin stems."
Three phrases do most of the work: solid fill, no gradients, and no thin lines. Add "each color as a separate layer" when you plan to cut in more than one material.
This route is also the answer to the uniqueness problem. Every crafter selling on the same marketplace is working from the same catalog of files. Generating your own means your listing is not competing against forty identical ones.
Clean It Up Before It Touches the Mat
Both routes get you most of the way there. The last few percent is faster to fix visually than to redo.
Open the file in the SVGMaker’s editor and you can:
- Delete a stray background shape. Select it, remove it, and the transparency is restored. This is the fastest fix for the white box problem.
- Simplify fiddly paths. If a converted design carries more detail than your material can hold, drop the parts that will tear.
- Recolor per layer. Set each layer to the exact vinyl color you own so Design Space groups the mats the way you expect.
- Check scale. View the design at the size you actually plan to cut, not zoomed in. Detail that reads fine on screen often vanishes at 3 inches wide.
- Group and ungroup. Make sure each color lives on its own layer before export, so Design Space does not merge them.
- AI Editing: Edit and modify existing SVG files with SVGMaker's AI Editing tool.
The editor has a dedicated crafting and cutting workflow for exactly this, including a magic eraser for removing regions the converter picked up but you do not want.
Getting It Into Cricut Design Space
Once the SVG is clean, the import is short:
- In Design Space, open a new project and click Upload.
- Choose Upload Image, then select your SVG file. SVGs skip the cut type screen that raster images force you through, which is your first confirmation the file is a real vector.
- Click Add to Canvas. Your layers arrive intact.
- Ungroup to separate the colors onto individual mats, or leave it grouped if it is a single color cut.
- Use Attach to hold pieces in position, or Weld to fuse overlapping shapes into one continuous cut line. Script fonts and connected lettering almost always need Weld.
If the file still lands as Print then Cut, that is Design Space telling you there is a raster image inside the SVG rather than vector paths. Some files with an .svg extension are just a PNG wrapped in SVG tags. Run the original image through conversion instead.
Which Route Should You Use?
| Your situation | Best route | Why |
|---|---|---|
| You have a PNG, JPG, or photo already | Route 1, the converter | Turns pixels into real closed paths in seconds |
| You have a logo or a scanned sketch | Route 1, the converter | AI reconstructs clean curves from rough or compressed sources |
| The design does not exist anywhere yet | Route 2, generate it | Vector from the start, and nobody else is selling it |
| Someone already sells exactly what you want | Buy it | Fastest option when the file genuinely already exists |
| The file is close but has a white box or extra detail | The SVG editor | A visual fix takes seconds and beats redoing the conversion |
Frequently Asked Questions
1. Is a converted SVG really ready to cut, or do I still have to clean it up?
Usually ready. A clean source image with good contrast converts into closed, cuttable paths that Design Space accepts directly. The cleanups people still need tend to be about design intent rather than file structure: a detail that is too thin for the material, or a color you want to remove. Both take seconds in the editor.
2. Can I sell what I cut from an AI converted or AI generated SVG?
For designs you generate yourself or convert from artwork you own, yes. Where you have to be careful is the source material. Converting someone else's copyrighted logo or a licensed character does not make it yours, no matter how clean the vector comes out. The tool changes the file format, not the ownership.
3. Why does my SVG import as "Print then Cut" instead of a cut file?
Because there is a raster image inside it. Some files carry an .svg extension while containing nothing but an embedded PNG or JPG. Design Space sees pixels, so it offers the only thing it can do with pixels, which is print them. Convert the original image properly and it will import as a cut file.
4. Does this work with Silhouette Studio and laser cutters too?
Yes. A structurally clean SVG file for cricut with closed paths is machine agnostic. Silhouette Studio imports SVG directly on the Designer Edition and above. For laser cutting and CNC you will often need to convert the SVG to DXF afterward, but the vector cleanup work is identical either way.
5. How do I make SVG files for Cricut from scratch?
Start with a clear idea, then use SVGMaker to create a custom vector design from a text prompt. Refine the shapes, colors, layers, and paths in the SVG Editor, remove any unnecessary details, and export the finished file as an SVG. Before cutting, upload it to Cricut Design Space and confirm that each element appears as a clean, separate cut layer.
6. Why is there a white box behind my design, and how do I remove it?
SVG has no background property, so white is never automatic. It means a white shape was explicitly added, usually a full canvas rectangle exported along with the artwork by a design tool. Open the file in the editor, select that rectangle, and delete it. The transparency comes back immediately.
7. Can I convert a photo of a hand drawn sketch?
Yes, and it is one of the strongest use cases. Photograph the drawing in even light, avoid shadows across the paper, and get as close to straight on as you can. AI photo to svg converter handles the paper texture and uneven pencil pressure that defeat threshold based tracing, and returns smooth closed paths.
8. Do I need Cricut Access to use my own SVG files?
No. Uploading your own SVG and cutting it is free in Design Space. Cricut Access is a subscription for their own image and font library. Bringing your own files is exactly how you avoid paying for it.
9.How can I edit SVG files for Cricut without breaking the cut?
Open a copy of the SVG in an editor, let's remove unwanted backgrounds with ai or stray shapes, simplify overly detailed paths, organize color layers, and preserve the file’s size and viewBox. Export the edited SVG and test it in Cricut Design Space before cutting your final material.
10.Where can I find fall or Christmas SVG files for Cricut?
Instead of using the same free designs found across marketplaces, you can create original fall and Christmas SVG files with SVGMaker. Enter a prompt such as “Christmas tree with ornaments,” “Santa silhouette,” “fall pumpkin wreath,” or “Merry Christmas script,” and the SVGMaker’s AI will create a unique, editable SVG design in seconds. Review and refine the paths in the SVG Editor before uploading the file to Cricut Design Space.
Conclusion
Getting an SVG for Cricut used to mean picking your poison: pay per file on a marketplace, learn node editing, keep an Illustrator subscription running, or wait on a designer. All four exist because turning a picture into cuttable paths was genuinely hard.
It is not hard anymore. If you already have the image, run it through the SVG image converter and get real closed paths back in seconds. If the design does not exist yet, describe it to SVGMaker and generate it as a vector from the start. Either way, give it ten seconds in the SVG editor following svg file editing guide to strip any background shape and confirm your thinnest detail survives at cut size.
Then upload, ungroup, weld, and cut. The machine was never the bottleneck. The file was.