Convert Any Photo to Printable SVG Stencils Online
You found the perfect photo of your dog. You ran it through a free tracer, downloaded the SVG, and sent it straight to your cutting machine. Ten minutes later you peeled the vinyl off the mat and watched the whole thing fall apart in your hands. Both eyes dropped out as loose black ovals. The whiskers tore. What was left looked less like a dog and more like a puddle.
Nothing went wrong with the tracing. The file was a perfectly good vector. It just was not a stencil.
This is the single most common frustration in photo to stencil work, and almost nobody explains it before you waste your material. A stencil is not simply a black and white version of a picture. It is a physical object that has to hold itself together after you cut every dark region out of it. That one requirement changes everything about how you prepare the photo, how you trace it, and what you fix afterwards.
In this guide you will learn what actually separates a stencil from an ordinary vector, which photos are worth attempting in the first place, the exact settings to use when you convert, and how to repair the two problems that break more stencils than anything else: missing bridges and floating islands. No design software, no code, and nothing you need to buy before you start.
What Makes a Stencil Different From a Normal SVG
An SVG (Scalable Vector Graphics) file describes shapes with mathematics instead of pixels, which is why it stays perfectly sharp whether you cut it at two inches or two feet. That much is true of every vector file.
A stencil adds one hard rule on top: everything that survives the cut has to stay physically connected to everything else. Your machine removes the dark areas. Whatever remains is a single piece of card, vinyl, or acetate that you will pick up, tape to a wall, and spray through. If a piece is not attached to the rest, it is not part of your stencil. It is litter on your cutting mat.
Four terms come up constantly once you start thinking this way.
| Term | What it means | Why it matters for a stencil |
|---|---|---|
| Bridge | A thin strip of material deliberately left in place to connect two regions | Without bridges, enclosed shapes drop out and your design collapses |
| Island | Any region completely surrounded by cut away area | An island with no bridge is unsupported and will fall out |
| Counter | The enclosed hole inside a shape, like the middle of a letter O or the white of an eye | Counters are the most common islands people forget about |
| Negative space | The material you keep, which becomes the untouched part of your final artwork | Paint or ink passes only through the cut areas, so the negative space carries the image |
Here is the part that trips people up. When you look at a traced photo on screen, the eye whites of your dog look connected, because they sit inside a face you can clearly see. But the software does not see a face. It sees a dark shape with a lighter shape floating in the middle of it, and once the dark shape is removed there is nothing holding the lighter one up.
The good news is that this is a solvable problem, and it is solvable in the browser. You just have to solve it deliberately instead of hoping.
Which Photos Actually Make Good Stencils
Before you upload anything, it is worth knowing what you are working with. Some photos become excellent stencils in under five minutes. Others will fight you for an hour and still look muddy. The deciding factor is almost always contrast, not resolution and not subject matter.
| Photo type | How well it stencils | What to do about it |
|---|---|---|
| Portrait with strong side lighting | Excellent | Trace as is. The shadows already give you clean separated regions |
| Backlit subject against a bright sky | Excellent | Nearly a silhouette already. Expect very few islands to fix |
| Logo, sign, or product shot on a plain background | Excellent | The cleanest possible starting point |
| Pet or person photographed outdoors in daylight | Good | Crop tight and raise the contrast before uploading |
| Busy group shot or crowded scene | Poor | Crop down to one subject. A stencil cannot carry five faces |
| Flat evenly lit indoor photo | Poor | There are no shadows to trace. Raise contrast heavily or pick another photo |
| Dark or grainy low light phone photo | Poor | The grain becomes hundreds of tiny specks. Try a different shot |
If your photo falls into the bottom half of that table, the fastest fix is not a better tracer. It is a better photo, or ten seconds of contrast adjustment on the one you have.
Prepare Your Photo First
Two minutes of preparation saves twenty minutes of cleanup. You can do all of this in whatever photo app is already on your phone or computer. There is nothing specialised here.
- Crop tight around one subject. A stencil works by simplification. The more of the frame your subject fills, the more detail survives at cutting size. Trim away everything you are not going to keep.
- Push the contrast up. Drag the contrast slider higher than looks natural. You want the photo to separate into clear light and dark regions rather than a smooth gradient. What looks harsh and overdone on screen usually traces beautifully.
- Simplify or flatten the background. A cluttered background traces into shapes that compete with your subject. If your photo app can lighten or blur the background, do it. If it cannot, crop harder.
- Do the background removal in your photo app. Our background remover is built for SVG files, so it is the wrong tool for this stage. Handle the photo background before you upload, using whatever cutout tool your phone or editor already provides.
- Check the subject reads as a shape. Squint at the photo, or shrink it to thumbnail size. If you can still tell what it is, it will stencil. If it turns to mush, no amount of tracing will rescue it.
One more thing worth knowing up front: bigger source files are not automatically better. A clean, well lit photo at moderate size beats a huge, noisy one every time, because noise becomes speckles and speckles become work.
Step by Step: Photo to Stencil SVG
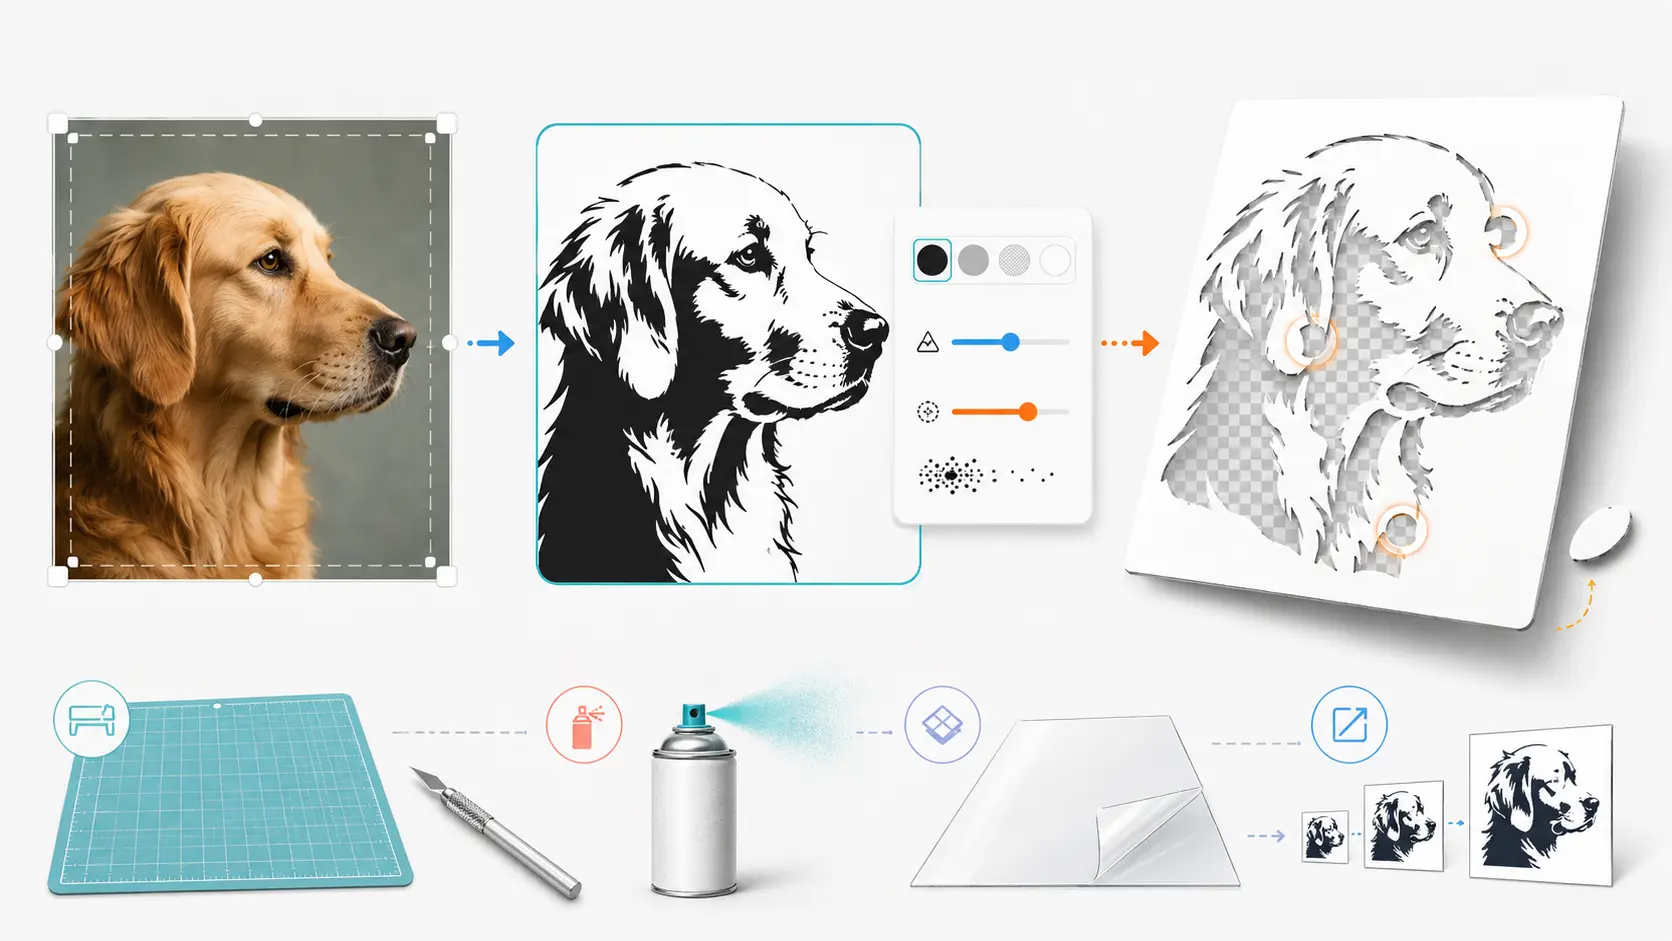
Now the actual conversion. Open the online svg converter and work through these five steps.
Step 1: Upload your photo. Drag in a JPG, PNG, or WebP file. You can drop in up to ten files at once if you are building a set, and each file can be up to 25MB. Set your output format to SVG.
Step 2: Switch the preset to B&W. This is the most important single choice you will make, and it is the one most people miss. The converter offers three presets: Photo, Poster, and B&W. Photo and Poster both trace in colour, which produces a lovely vector illustration and a completely unusable stencil. B&W collapses your image into two tones, which is exactly what a stencil is. Select it before you touch anything else.
Step 3: Set the Detail level. The Detail slider runs from 0 to 100 and controls how much of the photo's fine structure survives the trace. This is your main creative control, and it is a direct tradeoff.
Step 4: Raise Reduce Noise until the speckles disappear. Reduce Noise runs from 1 to 8 and removes small isolated regions. Every dust mote of grain in your photo traces as a tiny separate shape, and every one of those is an island your cutter will try to cut. Raising this value deletes them in bulk. Start around 4 for a clean photo and push toward 8 for anything grainy.
Step 5: Preview, then download. Check the preview at the size you actually intend to cut, not zoomed in. Details that look crisp at 400 percent zoom often vanish at four inches wide. When it looks right, download the SVG.
Here is what each control does specifically to a stencil, as opposed to a general illustration.
| Control | Range | Effect on your stencil |
|---|---|---|
| Preset | Photo, Poster, B&W | Always B&W. The other two trace in colour and cannot be cut as a stencil |
| Detail | 0 to 100 | Low keeps bold solid shapes that cut reliably. High captures fine texture but creates fragile thin strips that tear |
| Smoothness | 0 to 100 | Higher gives flowing curves that cut cleanly. Lower keeps sharp literal edges and more jitter |
| Corners | 0 to 100 | Controls how crisply angles are preserved. Raise it for architecture and lettering, lower it for faces and animals |
| Reduce Noise | 1 to 8 | Your main defence against floating islands. Higher removes more of the small loose specks |
If your first result is too fragile, lower Detail and raise Reduce Noise. If it is too blobby and has lost the subject, raise Detail slightly and lower Reduce Noise. Two or three passes will land you in the right place, and the preview updates fast enough that experimenting costs you nothing.
Fixing Bridges and Islands
Even a well traced file usually needs a short manual pass, because no automatic tracer knows which floating pieces you care about. Open your downloaded file in the manual editor and hunt for two things.
Find the islands first. The reliable trick is to look for enclosed light regions completely ringed by dark. In practice they cluster in predictable places:
- Eye whites and pupils, which is why traced portraits and pet photos fail so often.
- The insides of letters such as O, A, D, P, R, and B, if your photo contains any text or a sign.
- Gaps in hair, fur, and foliage, where a lighter patch sits fully surrounded by shadow.
- Windows and openings in buildings, cars, and machinery.
- Small highlights on shiny surfaces, jewellery, glass, and wet noses.
For faster cleanup, you can also use AI SVG editing to identify unwanted traced shapes, remove isolated fragments, restore missing details, and refine complex areas using simple text instructions before making any final manual adjustments.
Then build the bridges. A bridge is just a small strip of kept material joining the island to the nearest supported region. Draw a narrow rectangle spanning the gap and it becomes part of the stencil body. Place bridges where they read as intentional: along a natural line, at the edge of a shape, or somewhere a shadow would plausibly fall. Two thin bridges on opposite sides of an island usually look better and hold better than one thick one.
Bridge width depends entirely on what you are cutting.
| Material | Suggested bridge width | Note |
|---|---|---|
| Paper or cardstock | Wider | Tears easily, so be generous and expect single use |
| Acetate or mylar sheet | Medium | The best all round stencil material, forgiving and reusable |
| Adhesive vinyl | Medium to wide | Thin strips stretch and distort while you weed them |
| Wood or acrylic on a laser | Narrow | Rigid material supports much finer bridges |
While you are in the editor, delete any leftover speckles that Reduce Noise missed, and remove stray marks around the border of the artwork. Then zoom out to the size you plan to cut and look at the whole thing once more. If any region still looks unsupported, it is unsupported.
Printing and Cutting Your Stencil
Your finished SVG can go three different directions, and the file is the same in all three cases.
Print it and cut it by hand. The lowest cost route and a good way to test a design before committing material. Print onto cardstock or acetate at your final size, then cut the dark regions out with a craft knife on a cutting mat. Because SVG is resolution independent, you can scale to any size without the edges going soft.
Send it to a cutting machine. Cricut, Silhouette, and similar machines read SVG directly and cut the paths for you. Upload the file, size it, and cut. If your machine rejects the file or the import behaves oddly, our guide on creating Cricut ready SVG files for stencils and vinyl cutting walks through the import quirks and how to avoid paying a subscription for the privilege.
Export for a laser or CNC. If you are cutting a reusable stencil from acrylic or thin ply, convert your SVG to DXF, PDF, or EPS in the same converter you used for the trace. Rigid materials tolerate much finer bridges than vinyl does, so you can go back and slim yours down before exporting.
Whichever route you take, cut a small test first. A four inch test on scrap material tells you within minutes whether your bridges are wide enough, and it costs far less than discovering the answer halfway through a full sheet.
What You Can Make With It
Once you have a working photo to stencil workflow, the same file serves a surprising number of projects.
- Spray paint art, on canvas, walls, skateboards, and doors. The classic use, and the one that punishes weak bridges hardest.
- Glass and mirror etching, using vinyl as a resist for etching cream.
- Custom apparel and fabric, with fabric paint or as a screen printing stencil.
- Cake and cookie decorating, dusting cocoa or icing sugar through an acetate stencil.
- Wall art and room signage, scaled up large, which is where vector files earn their keep.
- Etsy and print on demand listings, selling the digital stencil file itself so buyers cut their own.
Common Problems and Fixes
| Problem | Likely cause | Fix |
|---|---|---|
| Stencil falls apart when you lift it | Islands with no bridges | Open it in the editor and connect every enclosed region |
| Result is an unrecognisable blob | Detail too low, or the source photo has weak contrast | Raise Detail, or raise contrast on the photo and retrace |
| Hundreds of tiny specks everywhere | Photo grain traced as separate shapes | Raise Reduce Noise toward 8 and retrace |
| Thin strips tear during weeding | Detail too high for the material | Lower Detail, and widen bridges in the editor |
| Output is in colour, not two tones | Preset left on Photo or Poster | Switch the preset to B&W and convert again |
| Looks great zoomed in, mush when cut | Judged at the wrong scale | Preview at your real cutting size before downloading |
| Edges look soft or wobbly | Smoothness set very low, or a blurry source photo | Raise Smoothness, or start from a sharper photo |
Frequently Asked Questions
1. Is converting a photo to an SVG stencil free?
Yes. The image converter runs in your browser with no subscription, and you can batch up to ten files at a time. You do not need to install design software or buy a licence before you start cutting.
2. What image formats can I upload?
JPG, PNG, and WebP all work, at up to 25MB per file. Set the output to SVG, which is the format cutting machines and design tools expect.
3. Will any photo work as a stencil?
Technically yes, practically no. Contrast decides the outcome. A strongly lit or backlit subject stencils beautifully, while a flat evenly lit or grainy photo produces either mush or a swarm of specks. Check your photo against the table above before you spend time on it.
4. Why does my stencil break apart when I cut it?
Because it contains islands with no bridges. Every region fully surrounded by cut away area needs a strip of material connecting it to the rest, or it drops out. Eye whites and the insides of letters are the usual culprits. Add the bridges in the editor before you cut.
5. Do I need to remove the photo background first?
It helps a great deal, but do it in your photo app rather than here. Our background remover works on SVG files, so it runs after a trace rather than before one. Cropping tight and lightening the background achieves most of the same benefit anyway.
6. Does the file work with Cricut and Silhouette?
Yes. Both read SVG directly, so you upload the downloaded file, size it, and cut. Our Cricut guide covers the import settings and the common reasons a file gets rejected.
7. What is the difference between a silhouette and a stencil?
A silhouette is one solid shape, so it never falls apart and needs no bridges. A stencil keeps interior detail, which is what makes it expressive and also what makes it fragile. If your design keeps breaking and you do not need the inner detail, a silhouette may be the better answer.
8. Can I sell what I make from a converted photo?
That depends on the photo, not on the tool. If you took the photo yourself, or hold the rights to it, the resulting stencil is yours to sell. If you pulled it from a search engine, you are working from someone else's copyrighted image and no conversion step changes that.
Conclusion
Turning a photo into a printable stencil comes down to three things. Start from a high contrast photo cropped tight to one subject. Trace it with the B&W preset, then balance Detail against Reduce Noise until the shapes are bold and the specks are gone. Finally, open the result in the editor and bridge every island before a single piece of material gets cut.
That third step is the one people skip, and it is the one that decides whether you peel a clean stencil off the mat or a pile of loose shapes.
Upload your photo to SVGMaker, keep the first test small, and cut something.