PNG to SVG AI Guide: Create Clean, Editable Vectors Without Messy Tracing
A crisp logo, a hand‑drawn sticker concept, a vintage clipart scan, a stylized product photo — every designer eventually hits the wall where these need to be scalable vectors. Traditional auto‑trace tools blindly hunt pixel edges and dump jagged paths, stray anchor points, and unwanted background shapes in your file. You burn more time cleaning the trace than it would take to redraw the whole thing.
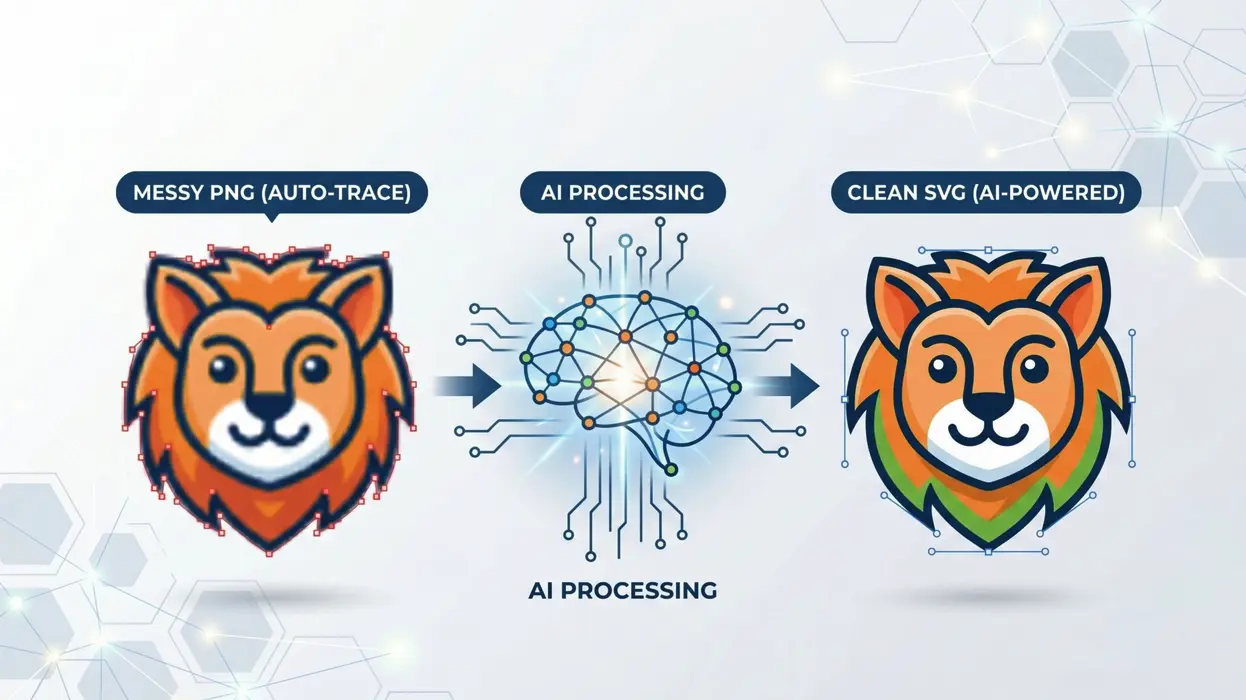
AI‑powered PNG to SVG conversion flips this completely. Instead of tracing edges, AI understands shapes, foreground, and background and then rebuilds your image as smooth, minimal‑node vector paths. Whether you're turning a sticker design into cut‑ready sticker to svg files, digitizing clipart to svg, or stylizing a product photo to svg, the workflow stays the same: upload, convert, download. This guide shows you exactly how to get clean, production‑ready results every time.
What Is PNG to SVG Conversion?
PNG is a raster format — a grid of pixels that pixelates when scaled. SVG is a vector format — mathematical lines and curves that stay sharp at any size.
Converting PNG to SVG transforms that fixed‑pixel image into scalable, editable vector art. You need this when you:
- Receive a logo only as a flat PNG and need it for signage, web, or print
- Want to edit individual elements — change colours, remove a background, resize shapes
- Prepare cut files for Cricut, Silhouette, or laser engraving
- Need ultra‑light web graphics that render perfectly on retina screens
SVGMaker's AI PNG to SVG converter handles this with zero manual tuning — upload your PNG, and the AI delivers a clean, lightweight SVG in seconds.
Auto-Trace vs. AI Vectorization: Why the Difference Matters
| Feature | Classic Auto‑Trace (Inkscape, Illustrator) | AI Vectorization (SVGMaker) |
|---|---|---|
| How it works | Scans pixel edges mechanically | Understands image content, shapes, and background |
| Path quality | Jagged curves, hundreds of anchor points | Smooth Bézier curves, minimal nodes |
| Background handling | Traces background into unwanted shapes | Automatically removed or kept transparent |
| Cut‑ready output (Cricut, Silhouette, laser) | Open paths, double cuts, excessive nodes | Closed paths, clean strokes, proper layers |
| Post‑conversion editing | Manual cleanup in Illustrator/Inkscape | Built-in AI editing ("remove background", "simplify", "change colour") |
| Batch processing | Manual, one file at a time | Upload multiple PNGs, download all SVGs at once |
AI vectorization doesn't trace — it recreates your graphic intelligently. The result is a truly editable SVG you can drop straight into Figma, Cricut Design Space, a React component, or a laser engraver.
Step-by-Step: Perfect PNG to SVG with AI
1. Prepare Your PNG
Use the highest resolution available. Crop away empty space. If you're working on a sticker design, make sure the PNG has a transparent background — the AI preserves the exact cut contour and produces clean paths for vinyl plotting. High‑contrast images always yield smoother vectors.
2. Upload to SVGMaker's Raster to Vector Converter
Go to SVGMaker AI SVG Converter and drop your PNG file. The AI processes it and returns an SVG in under 10 seconds — no threshold sliders, no mode guesswork.
3. Preview and Verify
SVGMaker shows the original PNG and the converted SVG side by side. Zoom in to inspect edges, colour accuracy, and fine detail.
4. Refine with AI Editing
Need a quick adjustment? Type a command in the editor:
- "Remove the background"
- "Change the blue to #2563EB"
- "Make the lines thicker"
- "Delete the small text at the bottom"
The AI edits the SVG while preserving the clean vector structure.
5. Download and Use Anywhere
Export your SVG and put it to work immediately in:
- Web development — inline SVG in HTML, React, Next.js
- Design tools — Figma, Canva, Illustrator, Sketch
- Craft cutting — Cricut Design Space, Silhouette Studio, Brother ScanNCut
- Laser engraving — Glowforge, xTool, LightBurn
- Print — merchandise, signage, packaging (infinitely scalable)
Common Use Cases for AI Vectorization
- Logos & icons — flawless shape recognition for branding assets and app icons.
- Clipart to svg — scanned line art, vintage illustrations, or digital clipart convert beautifully. The AI smooths noise while keeping the hand‑drawn character, something auto‑trace always destroys.
- Cricut & Silhouette crafts — closed paths, no double cuts, ready‑to‑cut layers. For crafters, our guide to the best SVG converter with AI for Cricut, Silhouette, and web walks through cut‑ready validation and material tips.
- Web graphics — SVGs under 10 KB that scale cleanly and support CSS styling.
- Laser cutting & engraving — clean strokes become cut lines, fills become engrave zones.
- Photo to svg — a well‑lit product shot on a clean background or a high‑contrast portrait vectorises into a striking, stylised graphic for t‑shirts, posters, and engraving.
Tips for the Best Results Every Time
- Start big — a 2000‑px‑wide PNG converts far more cleanly than a 200‑px thumbnail.
- One subject at a time — a single logo, sticker, or clipart element yields the cleanest paths. Multi‑element composites often produce messy vectors.
- For photos, prioritise contrast — the clearer the separation between subject and background, the better the photo to svg result. Flat, evenly lit product shots work best; complex landscapes won't convert cleanly.
- Convert first, recolor later — don't tweak colours in the raster file. Convert to SVG, then use the AI editor for non‑destructive colour changes.
- Check file size — a clean AI SVG of a simple icon or sticker should be under 20 KB. If it's over 100 KB, the source was likely too complex for pure vectorisation.
- Zoom test — at 400 %, AI‑converted paths stay smooth; auto‑traces start to break apart.
For a complete walkthrough on preserving every detail, read our article on how to convert PNG to SVG without losing quality.
Quick Comparison: SVGMaker AI vs. Traditional Tools
| Feature | SVGMaker AI | Inkscape Trace | Illustrator Image Trace | PicSVG |
|---|---|---|---|---|
| Understands image content | Yes | No | Partially | No |
| Minimal‑node clean paths | Yes | No | Sometimes | No |
| Auto‑background removal | Yes | No | No | No |
| Cut‑ready for Cricut & laser | Yes | Needs cleanup | Needs cleanup | No |
| AI editing after conversion | Yes | No | No | No |
| Batch conversion | Yes | Manual | Manual | No |
| Free daily credits | Yes | Free (open source) | Paid | Free |
Frequently Asked Questions
1. What is a raster to vector converter?
A tool that turns pixel‑based images (PNG, JPG) into scalable vector graphics (SVG, EPS). AI‑powered converters like SVGMaker analyse the image and generate smooth, editable paths instead of blindly tracing edges.
2. How do I convert a sticker design to SVG for clean cutting?
Upload the sticker PNG (preferably with a transparent background) to SVGMaker's converter. The AI preserves the cut contour, closes all paths, and removes the background. The sticker to svg output is ready for Cricut, Silhouette, or professional print.
3. Will my clipart lose its character when converted?
No. AI clipart to svg conversion smooths rough edges and noise while keeping the hand‑drawn feel. The result is a clean vector that doesn't look mechanically traced.
4. Can a photo really become a usable SVG?
Yes, when the photo has a clear subject and strong contrast — think studio product shots or high‑contrast portraits. The AI simplifies the image into a stylised scalable graphic. Complex, low‑contrast photos won't produce clean vectors, but a focused photo to svg conversion works surprisingly well for merchandise and engraving.
5. How do I preserve quality during PNG to SVG conversion?
Start with the largest PNG possible, ensure the background is clean (transparent or solid), and use an AI converter that understands image content rather than tracing edges. Detailed tips are in our guide on how to convert PNG to SVG without losing quality.
Start Converting Your PNGs to Clean Vectors
Stop wrestling with auto‑trace settings. Use SVGMaker's AI raster to vector converter for logos, stickers, clipart, and even photos. Upload your PNG, get a clean, editable SVG in seconds, and move straight to creating — no messy tracing, no wasted time.