How to Create SVG Files: Complete Beginner's Guide (2026)
You need a logo for your website. Or a set of icons for your app. Or a graphic for a presentation that won't turn into a blurry mess when you make it bigger. You search "how to create SVG" and get buried under results that assume you already know what a viewBox is or that you own Adobe Illustrator.
Here's the truth: creating SVG files is easier than most guides make it seem. You don't need expensive design software. You don't need years of graphic design training. In 2026, you have more free, beginner-friendly options than ever before — from writing a few lines of code in a text editor to typing a sentence and letting AI generate the graphic for you.
SVG (Scalable Vector Graphics) is the standard format for graphics that need to look sharp at any size. Every modern browser supports it. Every design tool can export it. And unlike PNG or JPG files, you can open an SVG in Notepad and actually read what's inside.
In this guide, you'll learn five different ways to create SVG files, starting from the most hands-on (writing code) to the fastest (AI generation). By the end, you'll have:
- Written your first SVG file by hand, with real code examples you can copy and modify.
- Used a free online SVG editor to create a vector graphic visually.
- Learned how to convert existing images (PNG, JPG, sketches) into clean SVG files.
- Generated an SVG from a text description using an AI SVG generator.
- Picked the method that fits your skill level and workflow.
Let's start with the basics.
What Is an SVG File? (The 60-Second Explainer)
SVG stands for Scalable Vector Graphics. It's an image format, but unlike the formats you're probably used to (PNG, JPG), an SVG file isn't made of pixels. It's made of code — specifically, XML markup that describes shapes, lines, curves, and colors using mathematical coordinates.
This distinction matters for one critical reason: SVG files scale to any size without losing quality. A PNG icon that looks crisp at 64 pixels becomes a blurry mess at 512 pixels. An SVG icon looks identical at both sizes because the browser recalculates the shapes mathematically every time it renders.
Here's how SVG compares to the two most common raster formats:
| Feature | SVG | PNG | JPG |
|---|---|---|---|
| Scales without quality loss | Yes | No | No |
| Editable with a text editor | Yes | No | No |
| Supports transparency | Yes | Yes | No |
| Best for photos | No | Sometimes | Yes |
| Best for icons, logos, graphics | Yes | Sometimes | No |
| Typical file size (simple icon) | ~1–5 KB | ~5–20 KB | ~5–15 KB |
| Can be styled with CSS | Yes | No | No |
The simple rule: if your graphic is made of shapes, lines, or text — not a photograph — SVG is almost always the right format. It's lighter, sharper, more accessible, and infinitely scalable.
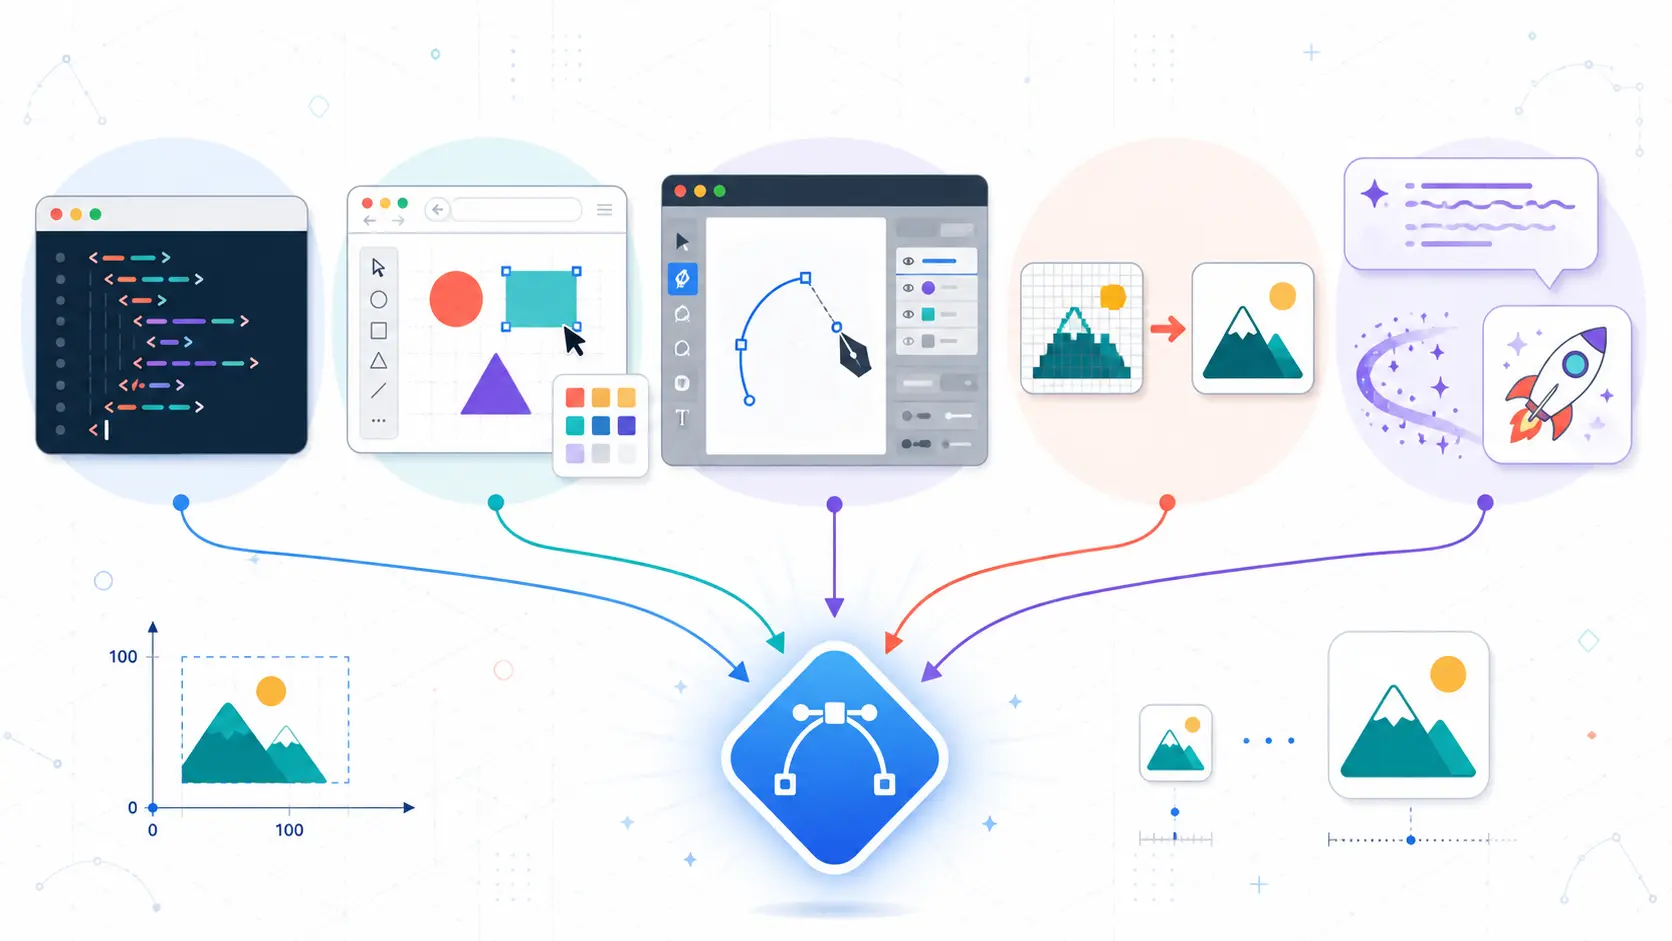
5 Ways to Create SVG Files
There is no single "right" way to create an SVG. The best method depends on your skill level, how much control you need, and how fast you want results. Here are the five approaches we'll cover, with a quick comparison to help you choose:
| Method | Skill Level | Cost | Speed | Best For |
|---|---|---|---|---|
| Hand-coding SVG | Intermediate | Free | Slow | Simple shapes, learning how SVG works under the hood |
| Online SVG editors | Beginner | Free | Medium | Quick visual design without installing anything |
| Desktop design tools | Intermediate–Advanced | Free (Inkscape) to Paid | Medium | Complex illustrations, professional design workflows |
| Converting images to SVG | Beginner | Free | Fast | When you already have a PNG, JPG, or sketch to vectorize |
| AI SVG generators | Beginner | Free tiers available | Very fast | Icons, logos, and infographics from text descriptions |
If you're a complete beginner, start with Method 1 to understand what's actually inside an SVG file. Then jump to Method 2 (visual editing) or Method 5 (AI generation) for real projects where speed matters.
Method 1: Create SVG by Hand-Coding
Every SVG file is just a text file with a .svg extension. You can create one in any text editor — VS Code, Sublime Text, even Notepad. This method teaches you exactly how SVG works, which makes every other method easier to understand.
The Basic SVG Skeleton
Every SVG file starts with the same boilerplate:
Here's what each part means:
xmlns— declares this as an SVG document (required for standalone .svg files).viewBox="0 0 200 200"— defines the coordinate system. Think of it as a 200×200 canvas where (0,0) is the top-left corner.widthandheight— the default display size. The SVG will scale to fit any container, but these set the starting dimensions.
Drawing Basic Shapes
SVG has built-in elements for common shapes. Here are the ones you'll use most:
Rectangle — <rect> with position (x, y), dimensions (width, height), optional rounded corners (rx), and color (fill):
Circle — <circle> with center point (cx, cy), radius (r), and color:
Line — <line> with start and end points, plus stroke styling:
Here's a complete example combining these shapes into a simple graphic:
Save this as my-first.svg and open it in any browser. You'll see a rounded gray card with a blue circle and rectangle. That's your first SVG.
Adding Text
The <text> element places editable, searchable text directly inside your SVG:
The text-anchor="middle" attribute centers the text horizontally at the x coordinate — a detail that trips up many beginners.
The Path Element: The Power Tool
The <path> element can draw anything — curves, complex outlines, logos — using the d attribute with a mini command language:
- M — Move to a point (like lifting your pen)
- L — Draw a straight line to a point
- C — Draw a cubic Bezier curve
- Z — Close the path (draw a line back to the start)
Here's a simple triangle:
Hand-writing complex paths is impractical — that's exactly why visual editors and AI tools exist. But understanding that every SVG shape ultimately comes down to paths gives you the foundation to edit and debug any SVG file you encounter.
Where to Write and Preview Your Code
You can use any text editor. Save the file with a .svg extension and open it in a browser to see the result. For a faster workflow with instant live preview as you type, use the SVG Code Editor — it runs in your browser with syntax highlighting, validation, and real-time rendering powered by the same Monaco editor that VS Code uses.
For a deeper walkthrough of hand-coding fundamentals, see our Creating Your First SVG tutorial.
Method 2: Create SVG with an Online Editor
If you'd rather design visually instead of writing code, an online SVG editor gives you the same result through a point-and-click interface — no software installation required.
Here's a step-by-step walkthrough using SVGMaker's SVG Editor:
- Open the editor — navigate to the SVG Editor in your browser. The canvas is ready immediately.
- Draw shapes — use the toolbar to add rectangles, circles, lines, and paths. Click and drag to position and resize them.
- Style your elements — adjust fill colors, stroke colors, stroke width, and opacity using the properties panel. For advanced color work, the SVG Color Editor offers AI-powered palette generation and gradient editing.
- Inspect the code — switch to the code view to see the SVG markup being generated in real time. This is where Method 1 and Method 2 connect: the visual editor writes the same XML you learned to write by hand.
- Export your SVG — download the file or copy the code directly. The output is clean, standard SVG that works in any browser, design tool, or application.
The advantages of this approach: zero setup, works on any device with a browser, free to use, and you learn SVG structure by watching the code update as you make visual changes. If you've already hand-coded an SVG using Method 1, you can paste that code into the SVG Code Editor and continue refining it visually.
Method 3: Create SVG with Desktop Design Tools
Desktop design software gives you the most control over complex illustrations, multi-layer compositions, and professional print-ready graphics. The three most popular options:
- Inkscape — free, open-source, and SVG-native. It saves directly to SVG format, making it the natural choice for dedicated vector work on a budget. Available on Windows, macOS, and Linux.
- Adobe Illustrator — the industry standard for professional vector design. Powerful but expensive ($22.99/month). Best for teams already in the Adobe ecosystem.
- Figma — free tier available, browser-based with an optional desktop app. Originally a UI/UX design tool, but its SVG export is clean and its collaborative features are unmatched.
The workflow is similar across all three: draw shapes, arrange them on an artboard, style them, and export as SVG. The critical step is the export settings — some tools embed unnecessary metadata, inline styles that could be in CSS, or even rasterized fallback images inside the SVG wrapper.
After exporting from any desktop tool, run your SVG through an optimizer to strip out the bloat. Our guide on SVG optimization techniques covers the specifics — including SVGO configuration and manual cleanup steps.
Method 4: Convert Existing Images to SVG
Sometimes you don't need to create an SVG from scratch — you already have the graphic as a PNG, JPG, or even a pencil sketch on paper. The challenge is converting that raster image into clean vector paths.
There are two approaches:
Automatic tracing uses algorithms to detect edges in your image and generate vector paths along those boundaries. The results are fast but often rough — expect jagged curves, excessive anchor points, and flattened layers that require manual cleanup.
AI-powered conversion uses machine learning to understand the image semantically — recognizing what's a shape boundary, what's a gradient, and what's background noise. The output is significantly cleaner, with smoother paths, fewer nodes, and better color accuracy.
Here's the quickest path from raster image to clean SVG:
- Go to the converter — open the PNG to SVG converter for AI powered vectorization
- Upload your image — drag and drop or click to upload.
- Download the SVG — the AI processes your image and returns an editable vector file.
- Refine if needed — open the result in the SVG Editor to adjust colors, remove unwanted elements, or fine-tune paths.
For hand-drawn content, the sketch-to-SVG converter is optimized for uneven line weights and organic shapes. For photographs that you want to stylize into vector art, AI Photo to SVG handles the more complex transformation from pixel-dense images to clean vector output.
Method 5: Create SVG with AI Generators
This is the newest and fastest way to create SVG files: describe what you want in plain English, and AI generates the vector graphic for you. No source image needed, no design skills required.
AI generation is best for icons, logos, simple illustrations, and infographics — the kinds of graphics where you know what you want conceptually but don't want to draw it yourself.
Here's a step-by-step walkthrough using SVGMaker's AI Icon Generator:
- Open the generator — navigate to the AI Icon Generator.
- Write a prompt — describe the SVG you want. Be specific about style, size, and color. For example: "A minimal line icon of a rocket ship, 24x24 grid, single color, 1.5px stroke width."
- Review the result — the AI returns a production-ready SVG in seconds. You can preview it at multiple sizes to verify it scales cleanly.
- Refine if needed — open the SVG in the SVG Editor for visual tweaks, or use the AI SVG Editor to make changes with natural language commands like "change the color to blue" or "remove the background shape."
- Download or copy the code — export the final SVG file, or copy the raw code for direct use in your project.
For data visualizations and charts, the AI Infographic Generator handles bar charts, timelines, comparisons, and other structured graphics as clean, editable SVGs.
One honest caveat: AI generation gets you 80–90% of the way to a finished graphic. For pixel-perfect results or strict brand guidelines, combine AI generation with manual editing. Our guide on cleaning up AI-generated SVGs covers the post-generation refinement process. You can also browse the SVG Gallery to see examples of what AI-generated vectors look like in practice.
Tips for Creating Better SVG Files
No matter which method you use, these practices will make your SVGs cleaner, smaller, and easier to work with:
- Always set a viewBox. This is the single most important attribute. A viewBox makes your SVG responsive — it scales to fit any container while maintaining its proportions. Without it, your SVG may render at a fixed size and ignore the container's dimensions.
- Use simple shapes when possible. A
<rect>withrxfor rounded corners is more readable and maintainable than a<path>that traces the same shape. Only use paths for complex curves that basic shapes can't express. - Keep decimal precision low. Coordinates like
12.847362add bytes without visual benefit — screens can't display sub-pixel differences. Round to 2 decimal places maximum (12.85). Most tools do this during optimization. - Remove unnecessary metadata. Design tools often embed editor-specific data, comments, and duplicate
idattributes. Strip these out before production use. - Add meaningful IDs and classes if you plan to style the SVG with CSS or manipulate it with JavaScript.
<circle id="progress-ring">is infinitely more useful than<circle id="Layer_1">. - Test at multiple sizes. Open your SVG and zoom from 16px to 1000px. If lines disappear, shapes misalign, or text becomes unreadable at small sizes, you need to simplify.
- Optimize before shipping. Run your final SVG through SVGO or an online optimizer to remove redundant code and minimize file size. Our SVG optimization techniques guide walks through the full process.
Frequently Asked Questions
1. Is it free to create SVG files?
Yes. You can create SVG files for free using any text editor (hand-coding), free desktop tools like Inkscape, or free online tools. SVGMaker offers a free tier that includes full access to the visual SVG Editor, SVG Code Editor, and daily credits for AI generation features.
2. What is the easiest way to create an SVG file?
For beginners who want a visual approach, an online SVG editor is the easiest starting point — you draw shapes and see the result immediately. For the absolute fastest method, AI SVG generator let you describe what you want in plain English and get a finished SVG in seconds.
3. Can I create SVG files without any design skills?
Yes. Hand-coding basic shapes (rectangles, circles, text) requires only an understanding of coordinates — no artistic ability. AI generators require no design skills at all. You describe the concept, and the AI handles the visual execution.
4. How do I convert a PNG or JPG to SVG?
Upload your image to a converter. The tool traces the image and outputs editable vector paths. For photographs or complex images, an AI-powered converter produces significantly cleaner results than traditional tracing algorithms.
5. Can I edit SVG files after creating them?
Yes. SVGs are text-based XML, so you can open them in any text editor and modify the code directly. For visual editing, use an online SVG editor. For code-level editing with live preview and syntax highlighting, use an SVG code editor.
6. What software opens SVG files?
All modern web browsers (Chrome, Firefox, Safari, Edge), design tools (Figma, Illustrator, Inkscape), and text editors (VS Code, Notepad++, Sublime Text). SVGs are one of the most universally supported file formats in existence.
7. Are SVG files good for printing?
Yes. SVGs are excellent for print because they scale to any size without losing quality. They're widely used for Cricut, Silhouette, laser cutting, vinyl cutting, and print-on-demand products like stickers, shirts, and mugs.
8. What is the difference between SVG and PNG?
SVG is a vector format — made of mathematical shapes that scale infinitely without quality loss. PNG is a raster format — made of pixels that become blurry when enlarged. SVG is better for graphics, logos, icons, and illustrations. PNG is better for photographs and screenshots.
Conclusion: Start Creating SVGs Today
You now know five different ways to create SVG files, from writing raw XML code to generating graphics with a single text prompt. The format itself is simpler than most people expect — it's just text that describes shapes. Once you understand that, every tool becomes easier to use because you know what's happening underneath.
Here's where to go next based on what you need:
- Want to understand SVG fundamentals? Work through our Creating Your First SVG tutorial for a deeper dive into the markup.
- Want to create SVGs visually right now? Open the SVG Editor — it's free and runs in your browser.
- Want the fastest path to a finished SVG? Try the AI App Icon Generator — describe what you need and download the result in seconds.
Try SVGMaker free — create, edit, convert, and optimize SVG files all in one place.