Best Way to Convert Low Res Images to Print Ready SVG with AI: POD Design Guide 2026
Introduction
Your design looks great on your laptop. The colors are really bright and the edges are sharp. You think it will sell well. Then you upload it to your print on demand store and order a sample. The shirt arrives with a fuzzy picture of your art. Sometimes the platform will not even accept the file because it is not clear enough.
This is a problem for a lot of people who sell print on demand products. Your laptop screen can make a low quality image look okay but printing press is different. When your artwork is printed on a tshirt, a tote bag or a poster you can see every mistake.
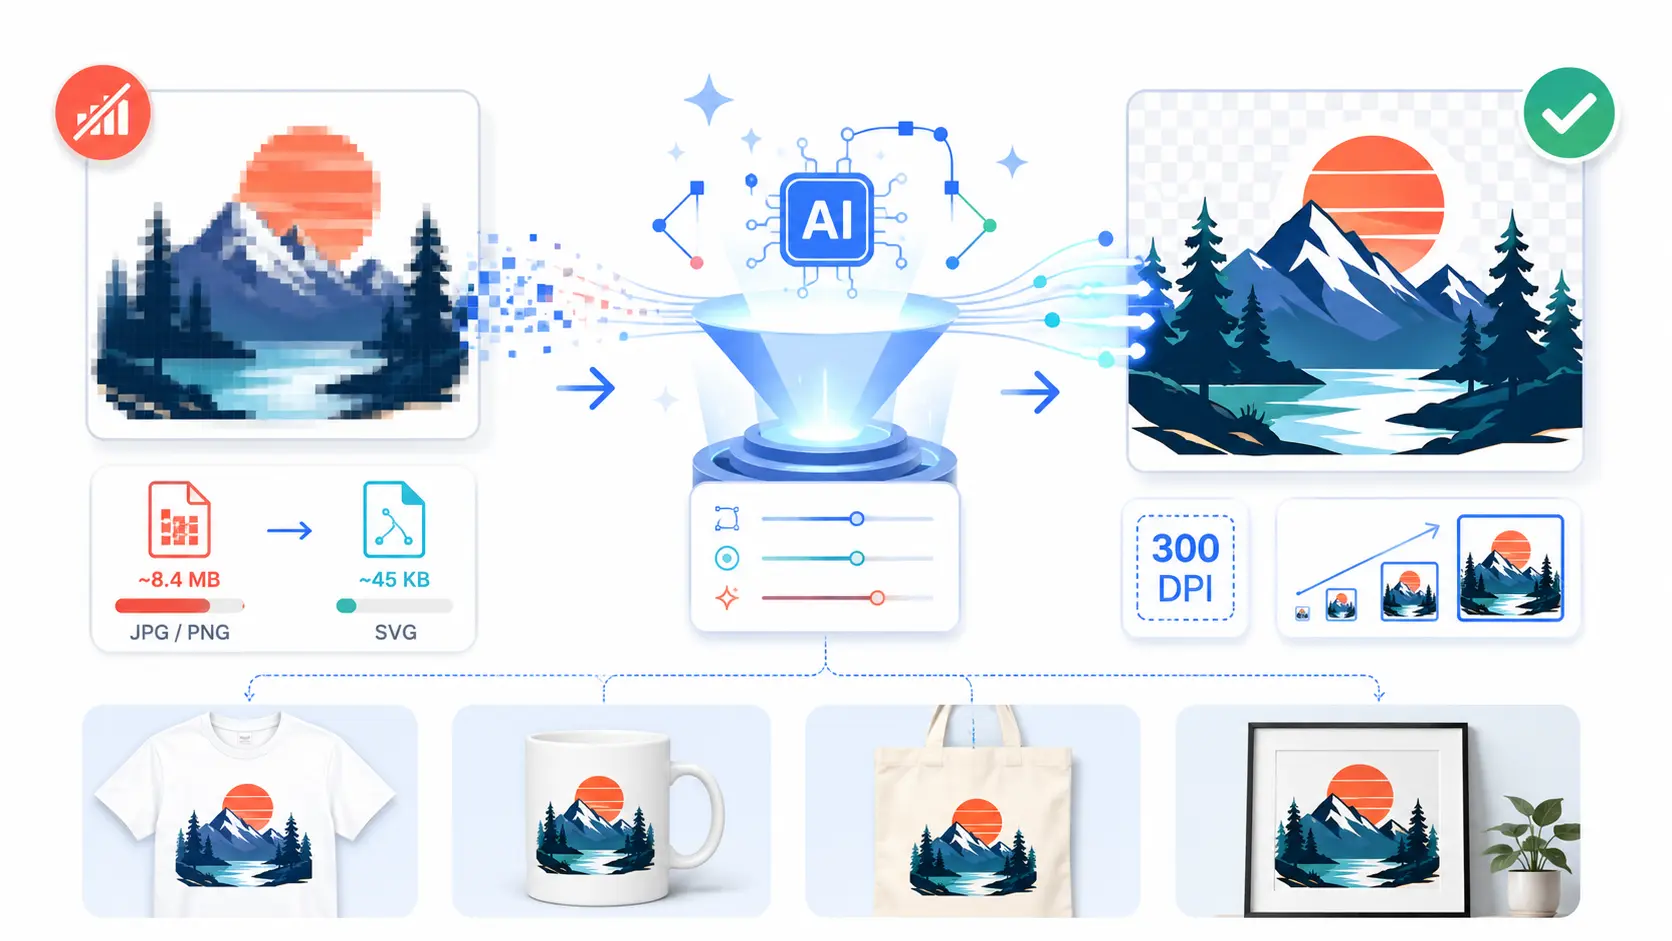
The solution is not to try to find a version of your image. The solution is to think about your image in a way. When you change a quality picture into a vector SVG, the file is no longer made up of little dots. It becomes a set of instructions that a printer can use to draw your image at any size. An AI SVG Converter can do this fast and it makes your image look clean and sharp on a coffee mug or a canvas print.
SVGMaker helps you turn quality images into clean and scalable SVG files for print on demand products. In this guide you will learn why vector images are best for print on demand, what quality each product needs and a simple step by step process to convert any quality image into a print ready SVG. If you are new to SVG files, our guide for beginners is a place to start before you read this.
Why Print On Demand Lives and Dies by File Quality
Print on demand is one of the easiest businesses to start. There is no inventory, no upfront stock, and no shipping to manage. You upload a design, someone buys it, and a print partner handles the rest. That low barrier is exactly why the market is crowded, and it is why file quality is the thing that separates a hobby store from a real brand.
Think about it from the buyer's side. Two stores sell a similar design. One print is soft and blurry with jagged edges. The other is clean and sharp all the way to the seams. The second store looks professional, earns trust, and gets the repeat customer. The only difference is the quality of the source file.
Your design file is the product. Everything else, the mockups, the listing copy, the ads, points back to what actually gets printed. Getting that file right is the highest leverage work you can do, and it starts with using a format built to scale.
Raster vs Vector for Print: Why Low Res Kills Your Design
To understand the fix, you need to understand the two kinds of image files.
A raster image (PNG, JPG, WebP) is a grid of colored pixels. It looks great at its native size, but stretches it larger than it was made for and the software has to invent pixels that were never there. That guesswork is what you see as blur and pixelation.
A vector image (SVG) stores shapes as math, not pixels. Lines, curves, and fills are described by coordinates, so the file can be drawn at any size with perfect edges. There is no native resolution to run out of.
| Factor | Low Res Raster (PNG, JPG) | Vector SVG |
|---|---|---|
| Scaling up | Blurs and pixelates | Stays perfectly sharp at any size |
| Edges | Soft or jagged when enlarged | Clean and crisp on every product |
| Resolution | Fixed, runs out fast | Independent, renders at whatever the printer needs |
| File size | Grows with resolution | Usually small and light |
| Editing colors | Repaint pixel by pixel | Swap a fill value in seconds |
| Print facility fit | Rejected if under spec | Renders at any DPI on demand |
The takeaway is simple. A vector SVG renders at whatever resolution the printer asks for, whether that is a wallet sized sticker or a wall sized poster, from the same single file.
Resolution and DPI Requirements by Product
Most print partners ask for 300 DPI, which means 300 dots of ink per inch. To hit that with a raster file, you need a specific pixel count for every product size. Miss it and the print looks soft. Here is a rough guide to what each product needs.
| Product | Minimum DPI | Print Size | Pixels Needed |
|---|---|---|---|
| T shirt | 300 | 12 x 16 in | 3600 x 4800 px |
| Coffee mug | 300 | 3.5 x 3.5 in | 1050 x 1050 px |
| Phone case | 300 | 3 x 5 in | 900 x 1500 px |
| Tote bag | 300 | 14 x 14 in | 4200 x 4200 px |
| Pillow cover | 200 | 18 x 18 in | 3600 x 3600 px |
| Poster | 150 to 300 | 18 x 24 in | 2700 to 7200 px |
| Canvas print | 150 | 24 x 36 in | 3600 x 5400 px |
Why AI Beats Manual Tracing and Upscaling
When people first hit the low res wall, they usually reach for one of two old fixes, and both fall short.
Upscaling tries to enlarge the raster and guess the missing detail. It can help a little, but a blurry source stays a slightly larger blurry source. The edges never truly sharpen because there is no real detail to recover.
Manual tracing in desktop software can produce a true vector, but it is slow, and basic auto trace tools often spit out a mess of hundreds of clumsy nodes that are hard to edit and heavy to print.
An AI Vectorization takes a smarter path. Instead of tracing pixel edges blindly, it reads the image the way a person would, identifying the shapes, edges, and color regions, then rebuilds them as clean, structured vector paths. The result is a lightweight SVG that looks intentional rather than machine traced, and it stays editable afterward.
This approach shines for the artwork print on demand sellers use most: logos, text based designs, badges, clipart, line art, and bold illustrations. These convert beautifully into crisp vectors. Very detailed photographs are the exception, since a photo turns into a stylized vector interpretation rather than a photo real print. For a deeper look at what converts well and how the process handles different file types, read our full guide on how to convert any image to SVG with AI.
The Workflow: From Low Res Image to Print Ready SVG with SVGMaker
Here is the full path, start to finish. Each step uses one tool inside SVGMaker, so you never have to leave the platform or juggle five apps.
Step 1: Start with Your Image
Grab whatever you have. The SVGMaker Converter accepts PNG, JPG, and WebP files up to 25MB. It does not matter that the file is low res. That is the whole point of what comes next.
Step 2: Convert to a Clean SVG
Upload your image to the SVGMaker Converter and let the AI rebuild it as true vector paths. If your art needs a little polish first, you can describe a change in plain language before converting, for example asking it to simplify busy detail or sharpen a shape, then generate the vector. You get a scalable SVG that looks clean rather than traced.
Step 3: Remove the Background
Almost every print on demand platform wants a transparent background so your design sits directly on the product with no white box around it. The quickest route is to open the file in the AI editor and simply type what you want, for example “remove the white background,” and the AI clears it for you. If you would rather do it in a single dedicated step, the AI SVG Background Remover strips the background in one click, and because it works on the vector itself rather than flattening it to pixels, you keep a sharp, scalable file.
Step 4: Clean Up, Recolor, or Tweak
Want to change the palette to match a product color, or drop an element you no longer need? Open the file in the editor and type what you want in plain English, such as changing every red element to navy. Prefer to point and click? The visual SVG editor lets you select and adjust shapes directly with a live preview.
Step 5: Export in the Right Format for Your Platform
Now ship it. If you sell digital cut files on Etsy, the SVG itself is your product. If your print partner wants a raster upload, export a high resolution PNG at the exact size the platform asks for. SVGMaker lets you export PNG at custom dimensions up to 4096 pixels, which is plenty to clear the 300 DPI bar on shirts, mugs, and bags. You can also export JPG, PDF, and other formats, and the SVGMaker’s converter handles batch jobs when you are prepping a whole product line at once. Now ship it. If you sell cut files on Etsy the SVG file itself is your product. If your print partner wants a raster upload just export a resolution PNG at the exact size they ask for. SVGMaker lets you export PNG at custom sizes up to 4096 pixels. That is more than enough to get a 300 DPI, for shirts, mugs and bags. You can also export JPG, PDF and other formats. The SVGMaker converter also handles batch jobs. This is super helpful when you are prepping a product line at once with SVGMaker.
Platform Specific Requirements
Every marketplace has its own upload rules. Getting these right the first time saves you from rejected listings and wasted sample orders.
| Platform | Format | Requirements | Notes |
|---|---|---|---|
| Printify and Printful | PNG | 300 DPI, transparent, under 25MB | A high res PNG exported from your SVG works perfectly |
| Redbubble | PNG | At least 2400 x 3200 px, transparent | Bigger exports give the platform more to work with |
| Merch by Amazon | PNG | 300 DPI, exact dimensions, transparent | Strict specs, so vectorizing first helps you avoid rejections |
| Etsy (digital) | SVG | Direct file sale | Sell the SVG itself as a cut file or template |
The pattern is clear. Build your master file as an SVG once, then export whatever each platform needs from that single source. One clean vector feeds every store you sell on.
Top POD Niches in 2026
If you are still choosing what to sell, these categories are drawing strong demand this year, and each one leans heavily on clean vector art.
- Personalized pet products, often built from a customer's own pet photo turned into vector art
- Fitness and wellness graphics, from gym slogans to habit trackers
- Eco living and sustainability designs with simple, bold statements
- Home decor, one of the fastest growing spaces, where crisp large format prints matter most
- Fandom and community art for niche audiences who value quality
Pick one, build a small set of clean designs, and test before you scale. If you want a full launch playbook, our guide on how to launch a POD store in 24 hours walks you through it end to end.
Common Mistakes to Avoid
- Uploading a low res raster straight to the platform. This is the number one cause of blurry prints and rejected listings. Convert to a vector first.
- Leaving a white background behind the art. It shows up as an ugly box on the product. Remove it before you export.
- Exporting at the wrong size. Check each platform's pixel and DPI spec and export to match it exactly.
- Forcing a busy photo into line art. Detailed photographs become stylized when vectorized. Use them where that look works, and keep true photo prints as high res raster.
Frequently Asked Questions
1. Can I really use a low res image for print on demand?
Yes, as long as you convert it to a vector first. A low res raster on its own will print blurry, but an AI SVG Converter rebuilds it as scalable vector paths that stay sharp at any print size. The starting resolution stops mattering once the file is an SVG.
2. Should I upload an SVG or a PNG to my print partner?
It depends on the platform. Most print partners like Printify and Redbubble want a high resolution PNG with a transparent background. Marketplaces that sell digital files, such as Etsy, take the SVG directly. The smart move is to build your master SVG once, then export a PNG at the required size when a platform needs it.
3. Do I need to worry about 300 DPI if I use a vector?
Much less. DPI is a pixel concept, and a vector SVG has no fixed pixels to run out of. You set the DPI at export time. When you export a PNG from your SVG at the platform's dimensions, you can hit 300 DPI easily because the vector fills that size cleanly.
4. Will the converted SVG still be editable?
Yes. The AI SVG Converter produces structured vector paths, not a flattened image, so you can recolor, resize, and reshape it afterward. You can make quick changes in plain English with the AI editor, or adjust shapes by hand in the visual editor.
5. How do I get a transparent background for my design?
Run your file through the SVGMaker Background Remover. It clears the background in one click and keeps the result as a clean, scalable vector rather than converting it to pixels, so your design drops onto any product with no white box around it.
6. Can I sell designs I converted with AI?
You can, as long as you own or have the rights to the original image and your AI tool permits commercial use. The conversion step changes the format, not your ownership. Always start from artwork you are allowed to sell.
7. What is the best format for each POD platform?
Use a transparent PNG for most print partners like Printify, Printful, Redbubble, and Merch by Amazon. Use the SVG itself for digital marketplaces such as Etsy. Building from one vector source lets you export the right format for any store without redrawing anything.
8. Can I convert a whole batch of designs at once?
Yes. Convert your designs to clean SVGs, then use the converter to process multiple files together when you are prepping an entire product line, which saves a lot of repetitive exporting.
Conclusion
Low res artwork does not have to hold your store back. The problem was never your design. It was the format. A fixed grid of pixels can only stretch so far before it falls apart, but a vector SVG scales to any product at any size with clean, professional edges.
The workflow is simple. Start with any image, convert it to a print ready SVG, remove the background, tidy it up, and export exactly what each platform needs. Low res goes in, a sharp scalable vector comes out.
Do that once for every design, and every product you sell looks like it came from a real brand. Ready to fix your files? Upload your first image to SVGMaker and turn it into a print ready SVG in minutes.