Best Way to Create and Edit SVG Illustrations for Websites: Developer Guide
Every developer has been there. You've built a fast, responsive website with clean architecture, but the illustrations let you down. Stock PNGs look blurry on retina displays, downloading icon packs gives you 500 files you don't need, and commissioning custom vector artwork takes weeks and thousands of dollars.
Meanwhile, your competitor's site loads instantly with crisp, animated SVG illustrations that scale perfectly from a smartwatch to a 4K monitor.
The gap between needing custom SVG illustrations and actually shipping them on your website has historically been enormous. You either learned Adobe Illustrator, hired a designer, or settled for generic assets that made your product look like every other template site on the internet.
That gap no longer exists. AI SVG Generator, AI SVG Editor, browser-based SVG Editor, and plugin ecosystems for tools like Figma and Framer have collapsed the entire illustration workflow into something a single developer can handle in minutes, not days.
This guide walks you through a complete, developer-friendly workflow—from using AI tools to create SVG, to refining them for brand consistency, exporting in the right formats, and integrating them seamlessly into your website. Whether you're building React components or working in a no-code platform like Framer, you'll learn how to produce production-ready illustrations without leaving your development environment.
If you're exploring tools to get started, we've also covered a curated list in our guide, "Top Free AI SVG Tools to Create and Edit SVG Vector Graphics Online (2026 Guide)", where you can compare the best platforms for generating and editing high-quality SVG assets.
Why SVG Illustrations Are the Best Choice for Modern Websites
Before diving into the workflow, it's worth understanding why SVG is the format you should default to for website illustrations. The short answer: SVGs are code, not pixels, and that distinction gives you superpowers as a developer.
Performance That Matters
A typical hero illustration exported as PNG might weigh 80-200KB. The same illustration as an optimized SVG? Often 5-20KB. That's not a marginal improvement; it's the difference between passing and failing Core Web Vitals. SVGs also render natively in the browser without decoding overhead, which means faster Largest Contentful Paint (LCP) scores.
Interactivity and Animation
Because SVGs are XML-based and live in the DOM, you can target individual elements with CSS transitions, animate paths with JavaScript, and create interactive illustrations that respond to user input. Try doing that with a WebP file.
Accessibility and SEO
SVGs support embedded <title> and <desc> elements, making your illustrations readable by screen readers. Search engines can also parse SVG content, giving your visuals a chance to contribute to your page's relevance signals.
SVG vs WebP vs PNG: Quick Comparison
| Feature | SVG | WebP | PNG |
|---|---|---|---|
| Scalability | Infinite (vector) | Fixed resolution | Fixed resolution |
| Typical file size (illustration) | 5-20KB | 30-80KB | 80-200KB |
| CSS/JS interactivity | Full DOM access | None | None |
| Animation support | Native (SMIL, CSS, JS) | Limited (animated WebP) | None (use APNG) |
| Accessibility | Semantic elements | Alt text only | Alt text only |
| Best for | Icons, illustrations, UI elements | Photos, complex imagery | Legacy support |
For a deeper comparison with real performance benchmarks, read our full analysis: SVG vs WebP vs PNG: Best Image Format for Web Performance in 2026.
Step 1: Creating SVG Illustrations with AI
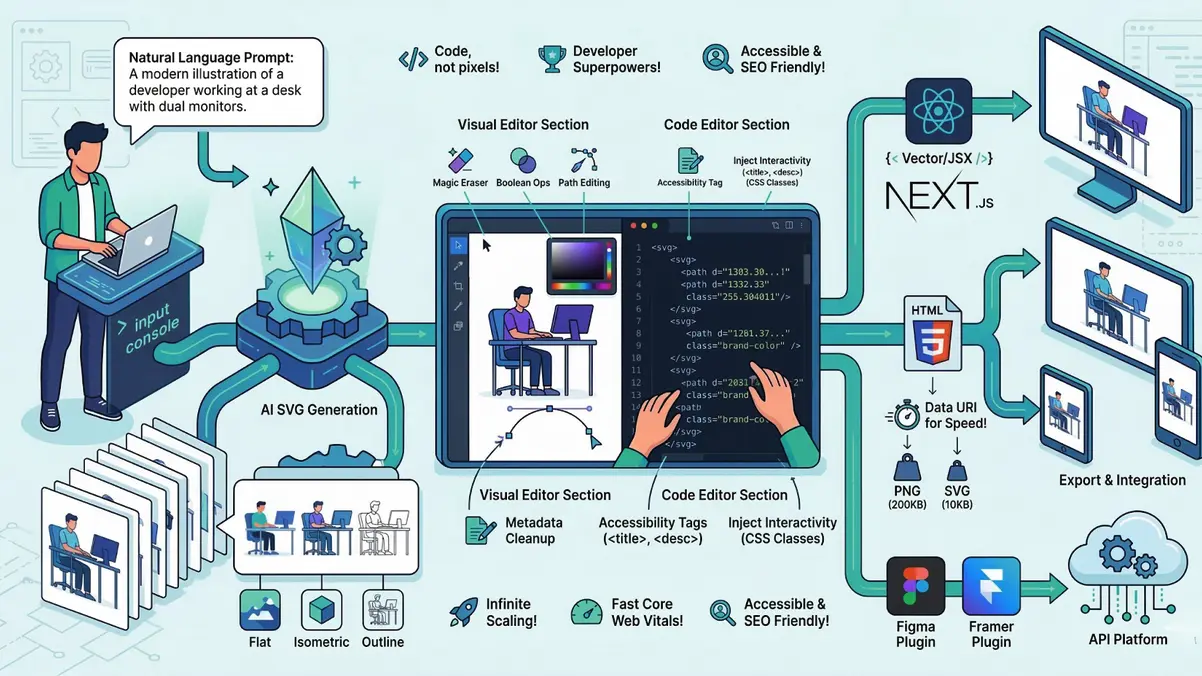
The first step in the workflow is generating your base illustration. Traditionally, this meant opening Illustrator, sketching shapes, tweaking Bezier curves, and spending hours on a single asset. With an AI SVG Generator, you describe what you want in plain English and get a production-ready vector file in seconds.
How AI SVG Generation Works
SVGMaker is an AI SVG Generator that takes a text prompt and outputs clean, semantic SVG code. Unlike general-purpose AI image tools that produce raster images (which you'd then need to trace back to vectors), SVGMaker generates native SVG from the start. No conversion step, no quality loss, no bloated path data from automated tracing.
Here's what a typical generation workflow looks like:
- Write your prompt: Describe the illustration you need. Be specific about style, subject, and intended use. For example: "A flat-style illustration of a developer working at a desk with dual monitors, using a blue and purple color palette, suitable for a SaaS landing page hero section."
- Choose a design preset: SVGMaker offers purpose-built presets including Flat, Minimalist, Outline, Isometric, Line Art, Silhouette, and more. Each preset constrains the AI to produce stylistically consistent output. For website illustrations, Flat and Isometric tend to work best for hero sections, while Outline and Minimalist are ideal for feature sections and documentation. Explore all the style options in the style customization guide.
- Generate multiple variations: SVGMaker produces up to four alternative versions per prompt, so you can compare compositions and pick the one that fits your layout. This saves the back-and-forth cycle of regenerating from scratch.
- Select and refine: Choose your preferred variation and move to the editing step.
For teams or automated pipelines, SVGMaker's API Platform lets you generate SVGs programmatically. You can integrate illustration generation directly into your CI/CD pipeline, design system tooling, or content management workflow. The full API Reference documents every endpoint and parameter.
If you want to learn the fundamentals step by step, our Creating Your First SVG tutorial walks through the entire process.
Step 2: Editing and Refining SVG Illustrations
AI gets you 80% of the way there. The remaining 20%, matching your exact brand colors, removing an unwanted element, adjusting proportions, or adding accessibility attributes, requires editing. SVGMaker provides three distinct approaches to editing of SVG illustration, each optimized for different tasks.
AI-Powered SVG Editing: Natural Language Commands
The fastest way to make changes is to describe them. SVGMaker's AI SVG Editor lets you modify existing illustrations using natural language prompts:
- "Change the background from white to transparent."
- "Replace the blue accent color with #6C63FF to match our brand."
- "Remove the decorative border and simplify the composition."
- "Add a laptop illustration to the character's desk."
This approach to SVG editing with AI is especially powerful for non-destructive iteration. You're not manually hunting through SVG path data; you're describing the outcome you want and letting the AI handle the implementation. It's the same workflow used for generation, but applied to an existing file. Learn more about the full capabilities in the AI-powered generation and editing documentation.
Visual Editing: The Browser-Based SVG Editor
For precise, hands-on control, SVGMaker's SVG Editor is a free, browser-based visual tool that requires no installation or sign-up. Think of it as a lightweight Illustrator that runs in your browser tab.
Key capabilities for SVG illustration editing:
- Color manipulation: Click any element and adjust its fill or stroke with a color picker. Useful for batch-updating brand colors across an illustration.
- Layer management: Show, hide, lock, and reorder layers in complex multi-element illustrations.
- Magic Eraser: AI-powered tool that intelligently removes unwanted elements while preserving the surrounding composition.
- Boolean operations: Combine, subtract, and intersect shapes for precise geometric editing.
- Path editing: Adjust individual anchor points and Bezier curves for fine-grained control.
- Transform tools: Flip, rotate, and crop elements with pixel-level precision.
The visual editor is ideal when you need to see the impact of changes in real time. For a full walkthrough of advanced editing features, see the advanced editing documentation.
Code-Level Editing: The SVG Code Editor
For developers who think in code, SVGMaker's SVG Code Editor provides a Monaco-based editing environment (the same engine that powers VS Code) with live preview.
This is where you handle production optimization:
- Clean up AI artifacts: Remove unnecessary
<metadata>, empty groups, and redundant attributes. - Optimize path data: Round coordinates, simplify curves, and reduce decimal precision.
- Add accessibility: Insert
<title>,<desc>, andaria-labelledbyattributes so screen readers can describe your illustration. - Format and validate: One-click Prettier formatting and real-time SVG syntax validation.
- Inject interactivity: Add CSS classes,
data-attributes, or inline event handlers directly in the SVG markup.
For optimization-specific workflows, check out the SVG optimization techniques tutorial and our guide on cleaning up AI-generated SVGs.
When to Use Which Editing Approach
| Task | Best Tool | Why |
|---|---|---|
| Quick color/style changes | AI SVG Editor | Fastest iteration, no manual work |
| Removing/adding visual elements | Visual SVG Editor | See results immediately in context |
| Accessibility attributes | SVG Code Editor | Direct control over markup |
| Performance optimization | SVG Code Editor | Fine-grained path and attribute control |
| Brand system compliance | Visual SVG Editor + Code Editor | Visual review plus code-level validation |
| Batch style updates | AI SVG Editor | Describe the change once, apply to many |
Step 3: Exporting SVG Illustrations for Your Stack
Once your illustration is polished, it's time to export it in the format your stack expects. SVGMaker supports a wide range of export options to fit any website building workflow.
Export Formats
- SVG — The default. Clean, optimized vector markup ready for inline embedding or external file loading.
- React / React Native components — JSX-ready components that you can import directly into your Next.js, Gatsby, or React Native project. No SVGR configuration needed.
- HTML/CSS — Self-contained HTML snippets with embedded SVG, useful for email templates or static sites.
- Data URI — Base64-encoded SVG for use as CSS
background-imagevalues orimgsrc attributes without an additional HTTP request. - PNG / JPG / WebP — Raster fallbacks at your specified resolution. Useful for Open Graph images, email clients, or CMS platforms that don't support inline SVG.
- PDF / EPS / AI / DXF — Vector format conversions for print workflows or legacy design tool compatibility.
Optimizing Before Export
Before exporting, run your illustration through SVGMaker's built-in optimizer. This strips metadata, minifies path data, and can reduce file size by 30-60% without visible quality loss. You can also generate SVGZ (gzip-compressed SVG) files for servers configured to serve compressed assets.
For format-specific conversions (e.g., converting existing JPG or PNG assets to SVG), the SVG Converter handles the heavy lifting. It uses AI-powered vectorization to produce clean paths rather than the jagged traces you'd get from basic auto-trace tools. Read more about conversion capabilities in the SVG conversion documentation.
Step 4: Integrating SVG Illustrations Into Your Website
The final step is getting your illustrations into your actual website. The approach depends on your stack.
For Developers: Code-Based Integration
If you're building with React, Next.js, or any component-based framework, you have several options:
- Inline SVG (recommended for interactivity): Paste the SVG markup directly into your JSX. This gives you full DOM access for CSS animations and JavaScript event handlers.
- As a React component: Export from SVGMaker as a JSX component, then import it like any other component. This keeps your SVG illustrations in your component tree with proper TypeScript types.
- External file with
<img>or CSSbackground-image: For illustrations that don't need interactivity, reference the SVG file externally. This enables browser caching but loses DOM access. - Data URI for critical above-the-fold assets: Embed the SVG as a data URI in your CSS to eliminate the network request entirely. Best for small, critical-path illustrations like hero section graphics.
With Figma: Design-to-Code Workflow
If your team's design workflow lives in Figma, the SVGMaker Figma Plugin lets designers generate and edit SVG logos, icons and illustrations directly on the Figma canvas using AI prompts. The plugin supports three workflows:
- Generate — Create new SVG illustrations from text prompts, placed directly on the canvas as editable vector layers.
- Edit — Select an existing illustration and modify it with natural language instructions.
- Convert — Turn raster images (PNG, JPG, WebP) into clean SVG vectors.
The generated illustrations are fully editable Figma layers, meaning developers can then export them using Figma's built-in export tools or copy the SVG code directly. This bridges the designer-developer handoff gap: designers create with AI, developers consume clean vectors.
With Framer: No-Code Website Building
For teams using Framer to build websites without code, the SVGMaker Framer Plugin brings the same AI generation and editing capabilities directly into the Framer canvas. You can generate SVG illustrations, edit existing images with AI prompts, and convert rasters to vectors — all without leaving your Framer project.
The plugin works in three modes:
- Canvas mode — Full generation UI; new SVGs are added as canvas elements.
- Image mode — Generate an illustration that fills a targeted frame.
- EditImage mode — Modify existing images in-place with AI editing or conversion.
This means non-technical team members can create and iterate on custom SVG illustrations for their Framer-built websites without touching code or switching tools. The plugin supports dark mode and adapts to Framer's native UI patterns.
Via API: Programmatic Integration
For automated workflows, the SVGMaker API Platform provides REST endpoints for generation, editing, and conversion. Common use cases include:
- CMS automation: Auto-generate featured images for blog posts based on title and category.
- Design system tooling: Batch-generate icon variants across themes programmatically.
- CI/CD pipelines: Validate and optimize SVG assets as part of your build process.
The API supports authentication via API keys and returns clean SVG output. Full endpoint documentation, code examples, and authentication guides are available in the API Reference.
For developers using AI-powered code editors like Claude Code, Cursor, or VS Code with Copilot, SVGMaker also offers an MCP server that integrates SVG generation directly into your coding environment.
What Makes SVGMaker Stand Out for Website Illustration Workflows
The core problem with the traditional SVG illustration workflow is fragmentation. You generate in one tool, edit in another, optimize in a third, and export from a fourth. Each tool switch introduces friction, format inconsistencies, and wasted time.
SVGMaker collapses this into a single platform:
| Workflow Step | Traditional Approach | SVGMaker |
|---|---|---|
| Create | Illustrator / freelancer / stock SVGs | AI SVG Generator with text prompts |
| Edit visually | Figma or Illustrator | Browser-based SVG Editor (free) |
| Edit code | VS Code + manual cleanup | Monaco-powered SVG Code Editor (free) |
| Edit with AI | Not available | Natural language AI SVG Editor |
| Optimize | SVGO CLI + manual config | Built-in one-click optimizer |
| Export | Manual format-by-format export | SVG, JSX, HTML, Data URI, PNG, WebP, PDF, EPS |
| Integrate with design tools | N/A | Figma Plugin + Framer Plugin |
| Automate | Custom scripts | REST API + MCP server |
The SVG Editor and SVG Code Editor are completely free with no sign-up required. AI generation and editing features use a credit system, and every account starts with free credits plus daily replenishment. The library of 7,000+ open-source vector icons is also free to use.
Explore the SVGMaker Gallery to see what other users are creating, or compare AI model outputs on the Model Comparison page.
Frequently Asked Questions
1. Can I edit SVG illustrations without knowing SVG code?
Absolutely. SVGMaker's AI SVG Editor lets you describe changes in plain English, and the visual SVG Editor provides a point-and-click interface for color changes, element removal, layer management, and more. The SVG Code Editor is available for developers who want it, but it's entirely optional.
2. What's the best export format for React or Next.js websites?
For illustrations that need interactivity or animation, export as a React/JSX component so you get a typed, importable module. For static illustrations, a standard SVG file loaded via <img> tag or Next.js Image component works well. For critical above-the-fold assets, consider a Data URI to eliminate the network request.
3. Can I use the SVGMaker Figma Plugin to edit existing illustrations?
Yes. The SVGMaker Figma Plugin supports three modes: Generate (create new), Edit (modify existing with AI prompts), and Convert (raster to vector). You can select any raster or vector image on your canvas and use natural language to modify it.
4. Is the SVG Editor free?
Yes. Both the visual SVG Editor and the SVG Code Editor are completely free with no account required. AI-powered features (generation, AI editing, conversion) use credits. New users receive free starting credits plus daily replenishment.
5. How does SVGMaker compare to manually creating illustrations in Adobe Illustrator?
Illustrator gives you maximum creative control but requires significant skill and time investment. SVGMaker trades some of that manual control for speed: you can go from idea to production-ready SVG in minutes rather than hours. For most website illustration needs (hero graphics, feature section visuals, icons, infographics), the AI-generated output is more than sufficient, and the three-tier editing system (AI, visual, code) lets you refine as needed.
6. Can I automate SVG illustration creation with an API?
Yes. The SVGMaker API Platform provides REST endpoints for generation, editing, and conversion. You can authenticate with API keys and integrate SVG creation into CMS workflows, design system tooling, or CI/CD pipelines. See the API Reference for complete documentation with code examples.
Conclusion
The workflow for creating and editing SVG illustrations for websites no longer requires a design degree or an expensive software subscription. With the right tools, a single developer can go from a text description to a polished, optimized, production-ready vector illustration in minutes.
The process is straightforward: generate your base illustration with an AI SVG Generator, edit it using AI prompts, a visual editor, or direct code manipulation, export it in the format your stack needs, and integrate it via code, Figma, Framer, or API.
SVGMaker brings this entire pipeline into one platform. Whether you're building a SaaS landing page, an e-commerce storefront, or a documentation site, you now have a repeatable system for producing custom SVG illustrations that are fast, accessible, and sharp on every screen.
Start with a prompt. Ship with confidence.