SVG Not Editable in Framer? A Complete Figma-to-Framer Workflow for Editable Assets
You designed a clean icon set in Figma. Every stroke is intentional, every color is on-brand, and the layers are neatly organized. You export the SVGs, drop them into Framer, and suddenly nothing works the way it should. The icons render as flat images you can't select into. Colors are locked. Strokes have vanished. One file triggers the dreaded "SVGs with large images inside are not supported" error.
This is one of the most common frustrations in the Figma-to-Framer pipeline. The problem is rarely Framer itself — it's what happens to your SVG between Figma's export panel and Framer's canvas. Somewhere in that handoff, your carefully structured vector file gets flattened, bloated, or embedded with raster data that Framer can't parse as editable geometry.
The good news: this is entirely fixable. With the right preparation, export settings, and a quick cleanup pass, you can get fully editable SVGs into Framer every single time. This guide walks you through a four-step workflow — from Figma prep to Framer import — so you never have to wrestle with uneditable vectors again.
Quick Summary
- SVGs exported from Figma often become uneditable in Framer due to embedded raster data, flattened layers, or unsupported SVG features.
- The fix starts in Figma — proper layer structure, outlined strokes, and the right export settings prevent most issues before they happen.
- A post-export SVG cleanup step catches remaining problems like embedded images, unnecessary metadata, and non-standard attributes.
- SVGMaker can inspect, clean, and optimize your SVG files before importing into Framer, ensuring every asset stays fully editable.
- This workflow applies to icons, illustrations, logos, and any vector asset moving from Figma to Framer.
Why SVGs Lose Editability in Framer
Before diving into the fix, it helps to understand what's actually going wrong. Framer supports native SVG editing through its vector canvas (since the May 2025 vector updates), but it has strict size and complexity requirements. The most important limitation: Framer only treats SVGs under 10KB as editable vector layers. Above that threshold, Framer automatically converts the SVG into a flat, non-editable image layer. Even for manual imports, overly complex SVGs get rasterized by Framer's parser.
Here are the most common culprits:
| Problem | What Happens in Framer | Root Cause |
|---|---|---|
| SVG exceeds 10KB | Imported as a flat, non-editable image layer instead of a vector | Framer enforces a 10KB size limit for editable vectors; larger files are automatically converted to static images |
| Embedded raster images | "SVGs with large images inside are not supported" error | Figma bakes bitmap fills or effects into the SVG as Base64-encoded <image> tags |
| Complex filters or blend modes | SVG renders but can't be edited on Framer's vector canvas | Framer's parser can't decompose SVG filter primitives and falls back to rasterization |
| Deep nesting or bloated code | Slow import, loss of structure, rasterization | Unnecessary metadata, redundant groups, excessive decimal precision, or deeply nested layer groups |
| Outlined text | Text becomes uneditable path data | Text was converted to outlines before export, or Figma auto-outlined unsupported fonts |
| Wrong export method | Missing layer IDs, lost structure | Using drag-and-drop export instead of "Copy as SVG" or proper export settings |
| Post-component conversion | SVG loses the "size" property and can't be resized | Converting an SVG to a Framer component strips certain native SVG properties |
The 10KB threshold is the single biggest reason SVGs arrive in Framer as uneditable assets. The workflow below addresses all of these issues in order — preparation, export, cleanup, and import.
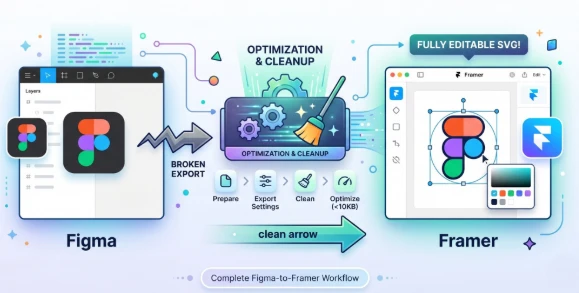
The Four-Step Figma-to-Framer Workflow
Step 1 — Prepare Your Assets in Figma
The biggest editability problems originate in Figma, not Framer. A few minutes of preparation before you export will save you significant debugging time later.
Flatten boolean operations
If you've used Union, Subtract, Intersect, or Exclude to combine shapes, right-click the result and select "Flatten" (Ctrl/Cmd + E). This converts the boolean group into a single clean path. Without flattening, Figma may export the original overlapping shapes with clip paths, which Framer often can't decompose back into editable geometry.
Decide on strokes vs. outlines
Framer's vector canvas handles both strokes and filled paths, but complex stroke configurations (dashed lines, variable-width strokes) sometimes render incorrectly. For simple icons with uniform strokes, keep them as strokes — they'll remain editable in Framer. For complex stroke effects, outline them in Figma first (Object → Outline Stroke).
Name your layers
Framer preserves layer names from the SVG's element IDs. Semantic names like icon-arrow, bg-circle, and label-text make your assets far easier to work with once they're in Framer. Generic names like Vector, Group 3, or Frame 47 become a nightmare when you're trying to select specific elements on Framer's canvas.
Remove raster fills and effects
If any layer uses an image fill, a bitmap texture, or effects like background blur that Figma renders as raster data, replace them with vector alternatives or remove them before export. These are the primary cause of the "large images inside" error.
Skip the manual work with AI
If you're creating assets from scratch, you can bypass many of these issues entirely. SVGMaker's Figma plugin lets you generate production-ready SVG icons and illustrations directly inside Figma using AI prompts. Because these are generated as clean vector code from the start, they avoid the raster contamination and structural issues that plague manually designed exports.
Step 2 — Export with the Right Settings
Figma offers several ways to get SVG out of a file. Not all of them produce Framer-friendly output.
Use "Copy as SVG" for small assets
Select the frame or component, right-click, and choose "Copy as SVG" (or Ctrl/Cmd + Shift + C). This copies clean SVG code to your clipboard that you can paste directly into Framer. It's the fastest method for individual icons and small illustrations, and it tends to produce leaner code than the file export panel.
Use the export panel for batches
When exporting multiple assets, use Figma's export settings with these options:
- Format: SVG
- Include "id" attribute: Enabled — this preserves your layer names as element IDs, which Framer uses for its layer panel
- Outline text: Enable this only if you don't need to edit text in Framer. If you want editable text, keep it off and ensure you're using web-safe fonts
- Simplify stroke: Disable — let Framer handle stroke rendering natively
Avoid drag-and-drop
Dragging a Figma frame directly into Framer often results in a rasterized PNG or a poorly structured SVG. Always use explicit SVG export or copy.
For a deeper comparison of Figma export methods and which plugins produce the cleanest SVG output, see our guide on which Figma plugin exports the cleanest SVG files.
Step 3 — Clean and Optimize Before Importing
Even with perfect Figma preparation, exported SVGs often contain unnecessary code that can interfere with Framer's vector editor. A quick cleanup pass makes a real difference.
Check the file size first
Remember: Framer only accepts SVGs under 10KB as editable vectors. If your exported SVG exceeds this, everything below is about getting it under that threshold. Open the file and check its size — if it's already under 10KB and contains no embedded rasters, you may be able to skip straight to Step 4.
Inspect the code
Open your exported SVG in SVGMaker's SVG Code Editor and look for red flags: <image> tags (embedded rasters — the primary cause of the "large images inside" error), <foreignObject> elements, inline <style> blocks with overly specific selectors, or path coordinates with 6+ decimal places. Any of these add unnecessary bytes and can cause editability issues in Framer.
Strip unnecessary metadata
Figma often injects comments, generator metadata, and redundant xmlns declarations. These add file size without adding value. The SVG Code Editor's real-time preview lets you delete these elements and immediately verify that the visual output stays intact.
Optimize path data
Coordinates like M 12.847362 24.193847 can be safely rounded to M 12.85 24.19 without any visible difference. This alone can cut file size by 20–30%, often enough to get a borderline SVG under Framer's 10KB limit. You can do this manually in the code editor or run the SVG through SVGMaker's SVG optimizer for automatic cleanup.
Verify editability before importing
Open the cleaned SVG in SVGMaker's Online SVG Editor and confirm you can select individual elements, change colors, and adjust paths. If it's fully editable here and under 10KB, it will be editable in Framer. This 30-second check prevents frustrating round-trips between Figma, your code editor, and Framer.
For more cleanup techniques, our guide on five methods to clean up AI-generated SVG files covers both manual and automated approaches.
Step 4 — Import into Framer the Right Way
With a clean, optimized SVG file in hand, the final step is getting it into Framer correctly.
Paste SVG code directly
The most reliable method is to copy your SVG code and paste it onto the Framer canvas (Ctrl/Cmd + V). Framer detects SVG markup in the clipboard and creates a native vector layer. This gives you full access to Framer's vector canvas — you can double-click into the SVG and edit individual paths, change fill colors, adjust strokes, and even animate specific elements.
Use Framer's insert menu for files
If you have SVG files on disk, use Insert → Image/SVG rather than dragging from your file manager. The drag-and-drop behavior can be inconsistent across operating systems and sometimes imports the SVG as a static image layer instead of an editable vector.
Leverage Framer's vector canvas
Once your SVG is on the canvas as a native vector, double-click it to enter vector editing mode. Here you can change individual fill and stroke colors, adjust corner radii, move anchor points, and apply Framer Variables for dynamic theming — all without leaving Framer.
Generate directly in Framer
If your workflow doesn't start in Figma, you can skip the entire export pipeline. SVGMaker's Framer plugin lets you generate AI-powered SVG icons, illustrations, and graphics directly on your Framer canvas. The output is clean vector code, so it's immediately editable — no cleanup required. For a detailed look at the best SVG plugins available for Framer, see our guide to Framer SVG plugins.
Quick-Reference Workflow Checklist
| Step | Action | Tool |
|---|---|---|
| 1. Prepare | Flatten booleans, name layers, remove raster fills | Figma + SVGMaker Figma Plugin |
| 2. Export | Use "Copy as SVG" or export with "id" attribute enabled | Figma |
| 3. Clean | Check file size (under 10KB), strip metadata, optimize paths, verify editability | SVGMaker SVG Code Editor + SVG Editor |
| 4. Import | Paste SVG code directly onto Framer canvas | Framer + SVGMaker Framer Plugin |
Frequently Asked Questions
1. Why does Framer show "SVGs with large images inside are not supported"?
This error means your SVG file contains an embedded raster image — a Base64-encoded <image> tag. Figma generates these when a layer uses an image fill, a bitmap effect, or a rasterized filter. Open the SVG in SVGMaker's SVG Code Editor, search for <image, and remove or replace those elements with vector alternatives. Alternatively, re-export from Figma with "Flatten" enabled.
2. What is Framer's SVG size limit for editable vectors?
Framer enforces a 10KB limit for editable SVGs. Any SVG above 10KB gets automatically converted into a non-editable image layer. Even for manual pastes, overly complex or large SVGs may be rasterized by Framer's parser. Keep your SVGs lean: strip metadata, optimize path data, and remove unnecessary groups to stay under the threshold.
3. Can I edit SVG colors and strokes directly in Framer?
Yes, but only if the SVG was imported as a native graphic layer (under 10KB and structurally simple). Double-click the SVG to enter vector editing mode, where you can change fill colors, stroke properties, manipulate anchor points, and assign Framer Variables for theme switching. SVGs that landed as image layers cannot be edited this way.
4. Do I need a plugin to import SVGs into Framer?
No. Framer natively supports SVG paste and file import. However, AI SVG platforms like SVGMaker add significant value by letting you generate, optimize, and insert production-ready SVGs without leaving Framer — and the plugin intelligently handles the 10KB limit by choosing the best insertion method automatically.
5. What's the fastest way to get editable SVGs if I don't use Figma?
Use SVGMaker's AI SVG generator to create icons or illustrations from a text prompt. The output is clean, semantic SVG code that typically stays well under 10KB for icons and simple illustrations — paste it directly into Framer, open it in the SVG Editor for refinement, or use the image to SVG Converter to transform existing raster images into editable vectors.
6. Can AI-generated SVGs from SVGMaker be used directly in Framer?
Yes. SVGMaker generates native SVG code — not rasterized images wrapped in SVG containers. For simpler SVGs that stay under 10KB, Framer treats the result as a native graphic layer you can fully edit. For more complex output, the Framer plugin automatically inserts it as an image layer, but you can still download the vector markup and use it in code or any SVG Editor.
Conclusion
Uneditable SVGs in Framer aren't a platform limitation — they're a pipeline problem. When you prepare your Figma assets correctly, export with the right settings, clean up the SVG code, and import using the paste method, your vectors arrive in Framer fully editable every time.
For teams that want to eliminate this friction entirely, SVGMaker offers a shortcut at every stage: generate clean SVGs with AI in Figma, optimize them in the SVG Code Editor, and insert them directly into Framer — no broken assets, no round-trips, no wasted time.