How to Group and Ungroup Elements in an SVG Editor
Quick Summary
- Grouping combines multiple SVG elements into one object using the <g> tag, letting you move, resize, and style them together.
- Ungrouping separates those elements back into individual parts for precise editing, color changes, or Cricut cutting preparation.
- Most grouping and cutting issues in Cricut Design Space trace back to incorrectly grouped or deeply nested SVG elements.
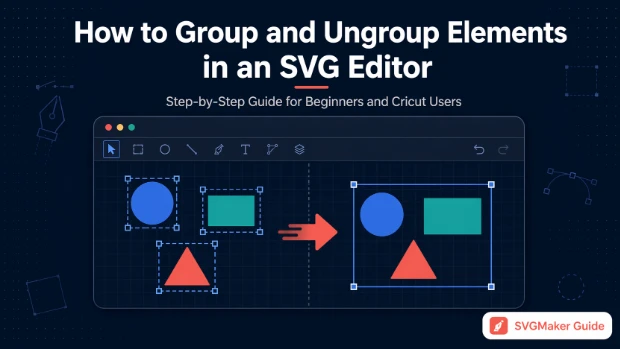
- SVGMaker's built-in SVG editor lets you group, ungroup, and clean up SVG files visually without touching any code.
- Knowing when to group and when to keep elements separate is the skill that separates clean SVG workflows from frustrating ones.
- This guide covers both actions step by step, including common problems and how to fix them.
What Does Grouping Mean in SVG?
Grouping means combining multiple elements so they behave as a single object. In SVG code, this is handled by the <g> tag, which wraps multiple child elements and treats them as one unit.
You do not need to write or edit any code to use grouping. Every modern SVG editor handles this through a toolbar button or right-click menu. Understanding the concept is enough.
When elements are grouped, you can:
- Move the entire design without anything drifting out of position
- Resize all parts proportionally with one action
- Apply a color, stroke, or opacity change to the whole group at once
- Export or transfer the design as a single manageable object
For example, if you are working on a logo made of a circle, a path, and a text element, grouping lets you treat the entire logo as one unit instead of clicking each piece individually every time you need to reposition it.
What Does Ungrouping Mean in SVG?
Ungrouping reverses the process. It separates a grouped object back into its individual elements so each one can be selected, edited, moved, or deleted independently.
This is equally important and often more urgent, especially when you receive a file from someone else or download a design from a resource site. Those files frequently arrive with elements grouped in ways that do not match your editing needs.
| Situation | Why Ungrouping Helps |
|---|---|
| Editing a downloaded design | Access and modify individual shapes |
| Fixing incorrectly imported files | Separate layers that were merged unintentionally |
| Preparing files for Cricut | Ensure each cut path is independent |
| Customizing part of a design | Change one element without affecting others |
| Removing unwanted elements | Delete specific parts after separation |
Grouping vs Ungrouping: At a Glance
| Action | What It Does | When to Use |
|---|---|---|
| Grouping | Combines elements into one object | Moving, resizing, exporting, styling |
| Ungrouping | Separates grouped elements | Editing parts, fixing files, cutting machine prep |
Step by Step: How to Group Elements in SVGMaker
Here is the exact process to group elements using SVGMaker's editor:
Step 1: Upload Your SVG File
Open SVGMaker and upload your SVG file into the editor. All elements will appear on the canvas as separate, selectable objects.
Step 2: Select Multiple Elements
Click on one element to select it. Then hold Shift and click each additional element you want to include in the group. Alternatively, click and drag your cursor across multiple elements to select them all at once.
Step 3: Confirm Your Selection
Check that all intended elements are highlighted before proceeding. Grouping with a missed element means you will need to ungroup and redo the action.
Step 4: Click the Group Option
Find the Group button in the toolbar and click it. All selected elements will now act as a single object.
Step 5: Test the Group
Click elsewhere to deselect, then click the group and try moving or resizing it. Everything should respond as one unified element.
Step by Step: How to Ungroup an SVG File in SVGMaker
Step 1: Open Your SVG File
Upload or open your SVG file in the SVGMaker editor.
Step 2: Select the Grouped Object
Click on the grouped element. It will highlight as a single object rather than showing individual elements.
Step 3: Click Ungroup
Find the Ungroup option in the toolbar and click it. The group structure is now dissolved.
Step 4: Check Individual Elements
Click somewhere neutral to deselect, then click on different parts of the design. Each element should now be selectable independently.
Step 5: Edit as Needed
Move, resize, recolor, or delete individual elements freely without affecting the rest of the design.
How to Ungroup SVG in Cricut Design Space
For Cricut users, ungrouping is a step that comes up in almost every project involving imported SVG files. Here is how it works inside Cricut Design Space:
- Upload your SVG file through the Upload panel and insert it onto the canvas.
- Click on the design to select it.
- Look at the Layers panel on the right side of the screen.
- Click the Ungroup button at the top of the Layers panel.
- Each element will now appear as a separate layer that can be moved, recolored, or deleted independently.
This is especially important for multi-color designs or layered iron-on projects where each color needs to be cut from a separate material. If elements remain grouped, Cricut treats them as one cut path, which causes cutting errors.
For creating clean, Cricut-ready SVG files before you even open Design Space, SVGMaker's generator and editor give you a starting point that is already properly structured. You can also read the guide on how to make SVG files for Cricut for a complete walkthrough.
Common Problems and How to Fix Them
The most frequent question from SVG beginners is: "Why did my design break when I imported it?"
In the majority of cases, the answer is a grouping issue. Here is a breakdown of what goes wrong and how to address it:
| Problem | Likely Cause | Fix |
|---|---|---|
| Elements stuck together | Unintentional grouping | Ungroup, then separate and regroup correctly |
| Shapes not cutting correctly | Grouped paths sent as one cut | Ungroup in Cricut before cutting |
| Layers overlapping incorrectly | Nested groups from original file | Ungroup multiple times, reorganize layers |
| Parts missing after import | Hidden elements inside a group | Ungroup and check each layer visibility |
| Design moves but breaks alignment | Partial grouping | Select all, regroup from scratch |
Understanding Nested Groups
Nested grouping means a group contains other groups inside it. This is common in complex SVG files, especially those exported from Illustrator or downloaded from design resource sites.
A structure like Group A containing Group B containing individual paths is nested grouping. It is not inherently wrong, but it can cause significant problems in cutting machine workflows.
Problems caused by deep nesting:
- Selecting elements requires multiple clicks to reach the right level
- Ungrouping once only removes the outer group, leaving inner groups intact
- Cricut Design Space may misread the hierarchy and cut incorrectly
- Editing becomes confusing when you cannot see the full layer structure
What to do about it: Ungroup multiple times until all elements are fully separated. In SVGMaker's editor, you can also inspect the layer panel to see how many levels of nesting exist. Then rebuild the grouping structure from scratch with only the groupings you actually need.
For a deeper look at cleaning up imported SVG files, the SVGMaker tutorial on cleaning AI-generated SVG applies the same principles to any complex or imported SVG file.
When to Group vs When to Keep Elements Separate
This is the judgment call that separates efficient SVG workflows from slow, frustrating ones.
Group elements when:
- You want to move or resize a complete design as one unit
- You are exporting a finished file to hand off or upload
- You need consistent styling applied to multiple elements
- You are working with a logo or icon that should always stay together
Keep elements separate when:
- You are preparing a file for a Cricut or Silhouette cutting machine
- You need to edit, recolor, or replace individual parts of a design
- You are working with layered designs where each layer cuts from a different material
- You are troubleshooting a design that is not behaving as expected
Troubleshooting: SVG Looks Fine But Cuts Wrong
This is one of the most common issues reported by Cricut users, and grouping is almost always the root cause.
| Possible Reason | What It Looks Like | Solution |
|---|---|---|
| Elements are grouped incorrectly | Design looks right but cuts as one shape | Ungroup in Design Space, separate cut paths |
| Hidden shapes are interfering | Extra cut lines appear on material | Ungroup, inspect all layers, delete hidden elements |
| Layers not properly separated | Colors bleed into each other on cuts | Ungroup, assign each color to its own layer |
| Nested groups unresolved | Partial ungrouping leaves clusters | Ungroup repeatedly until fully separated |
Once you have ungrouped and inspected every element, rebuilding the structure with intentional grouping almost always resolves the cutting issue. SVGMaker's guide on SVG optimization techniques also covers path cleanup steps that reduce cutting errors.
The SVG Group Tag Explained (Without the Technical Jargon)
For anyone curious about what is actually happening in the file, the <g> tag is the SVG element responsible for grouping. It looks like this in code:
<g id="logo-group">
  <circle cx="50" cy="50" r="40"/>
  <rect x="10" y="10" width="80" height="80"/>
  <text x="50" y="55">Brand</text>
</g>
Everything inside the <g> tag is treated as one unit. Applying a transform, color, or opacity to the <g> element affects everything inside it.
You do not need to edit this manually. SVGMaker's real-time code editor lets you see these changes reflected live as you group and ungroup visually, which is helpful for developers who want to understand what the tool is doing behind the scenes.
Using SVGMaker for Grouping and Editing
SVGMaker is built to make SVG file management accessible without requiring design software expertise. Within the editor, you can:
- Select and group multiple elements with one click
- Ungroup designs immediately for individual editing
- Inspect the layer structure and identify problematic nesting
- Clean up paths imported from other tools
- Prepare designs for Cricut, web use, or further editing in Figma via the SVGMaker Figma plugin
For users converting raster images into SVG before editing, the PNG to SVG converter and photo-to-SVG tool produce clean, structured files that are easier to group and organize from the start.
Frequently Asked Questions
How do I group elements in an SVG editor if I am a beginner?
Select multiple elements by holding Shift and clicking each one, then click the Group button in the toolbar. Make sure all intended elements are highlighted before grouping. Once grouped, they move and resize together as one object.
Can I group SVG elements online without installing software?
Yes. Browser-based tools like SVGMaker let you upload a file, select elements, and group them without downloading anything. This is the fastest option for quick edits without setting up desktop software.
What does the SVG group tag actually do?
The <g> tag in SVG wraps multiple elements so they behave as one unit. It does not change the visual appearance of the design but changes how elements are managed. Editors handle this automatically when you click Group.
How do I ungroup an SVG file after importing it?
Select the grouped object in your editor and click Ungroup. This separates all elements so you can edit them independently. If the file has nested groups, you may need to ungroup more than once.
Why does my SVG not cut correctly in Cricut?
The most common reason is improper grouping. Elements grouped together are read as a single cut path. Ungroup the design in Cricut Design Space, inspect each layer, and ensure each cut path is a separate element before sending to the machine.
What is the difference between grouping and layering in SVG?
Grouping combines elements so they act as one object. Layers control the stacking order of elements in the design. Both matter for organizing SVG files, but they serve different purposes. Grouping is about control, layering is about structure.
When should I group and when should I keep elements separate?
Group when you want to move, resize, or export a complete design as one unit. Keep elements separate when preparing files for cutting machines or when you need to edit individual parts of a design.
Conclusion
Grouping and ungrouping are two of the most fundamental operations in any SVG workflow. Whether you are preparing files for Cricut, cleaning up a downloaded design, or organizing a multi-layer project, knowing when to combine elements and when to separate them gives you full control over your work.
Most cutting errors, broken imports, and editing frustrations trace back to grouping issues that are straightforward to fix once you understand the structure. Ungroup to inspect, regroup with intention, and your designs will behave exactly as expected.
Tools like SVGMaker make the entire process visual and accessible, from generating clean SVG files to grouping, ungrouping, and editing them without writing a single line of code. Start with a well-structured file and the rest of your workflow falls into place.