Best Workflows to Generate AI SVGs with Exact Hex Codes & Recolor for Multiple Themes (Step-by-Step)
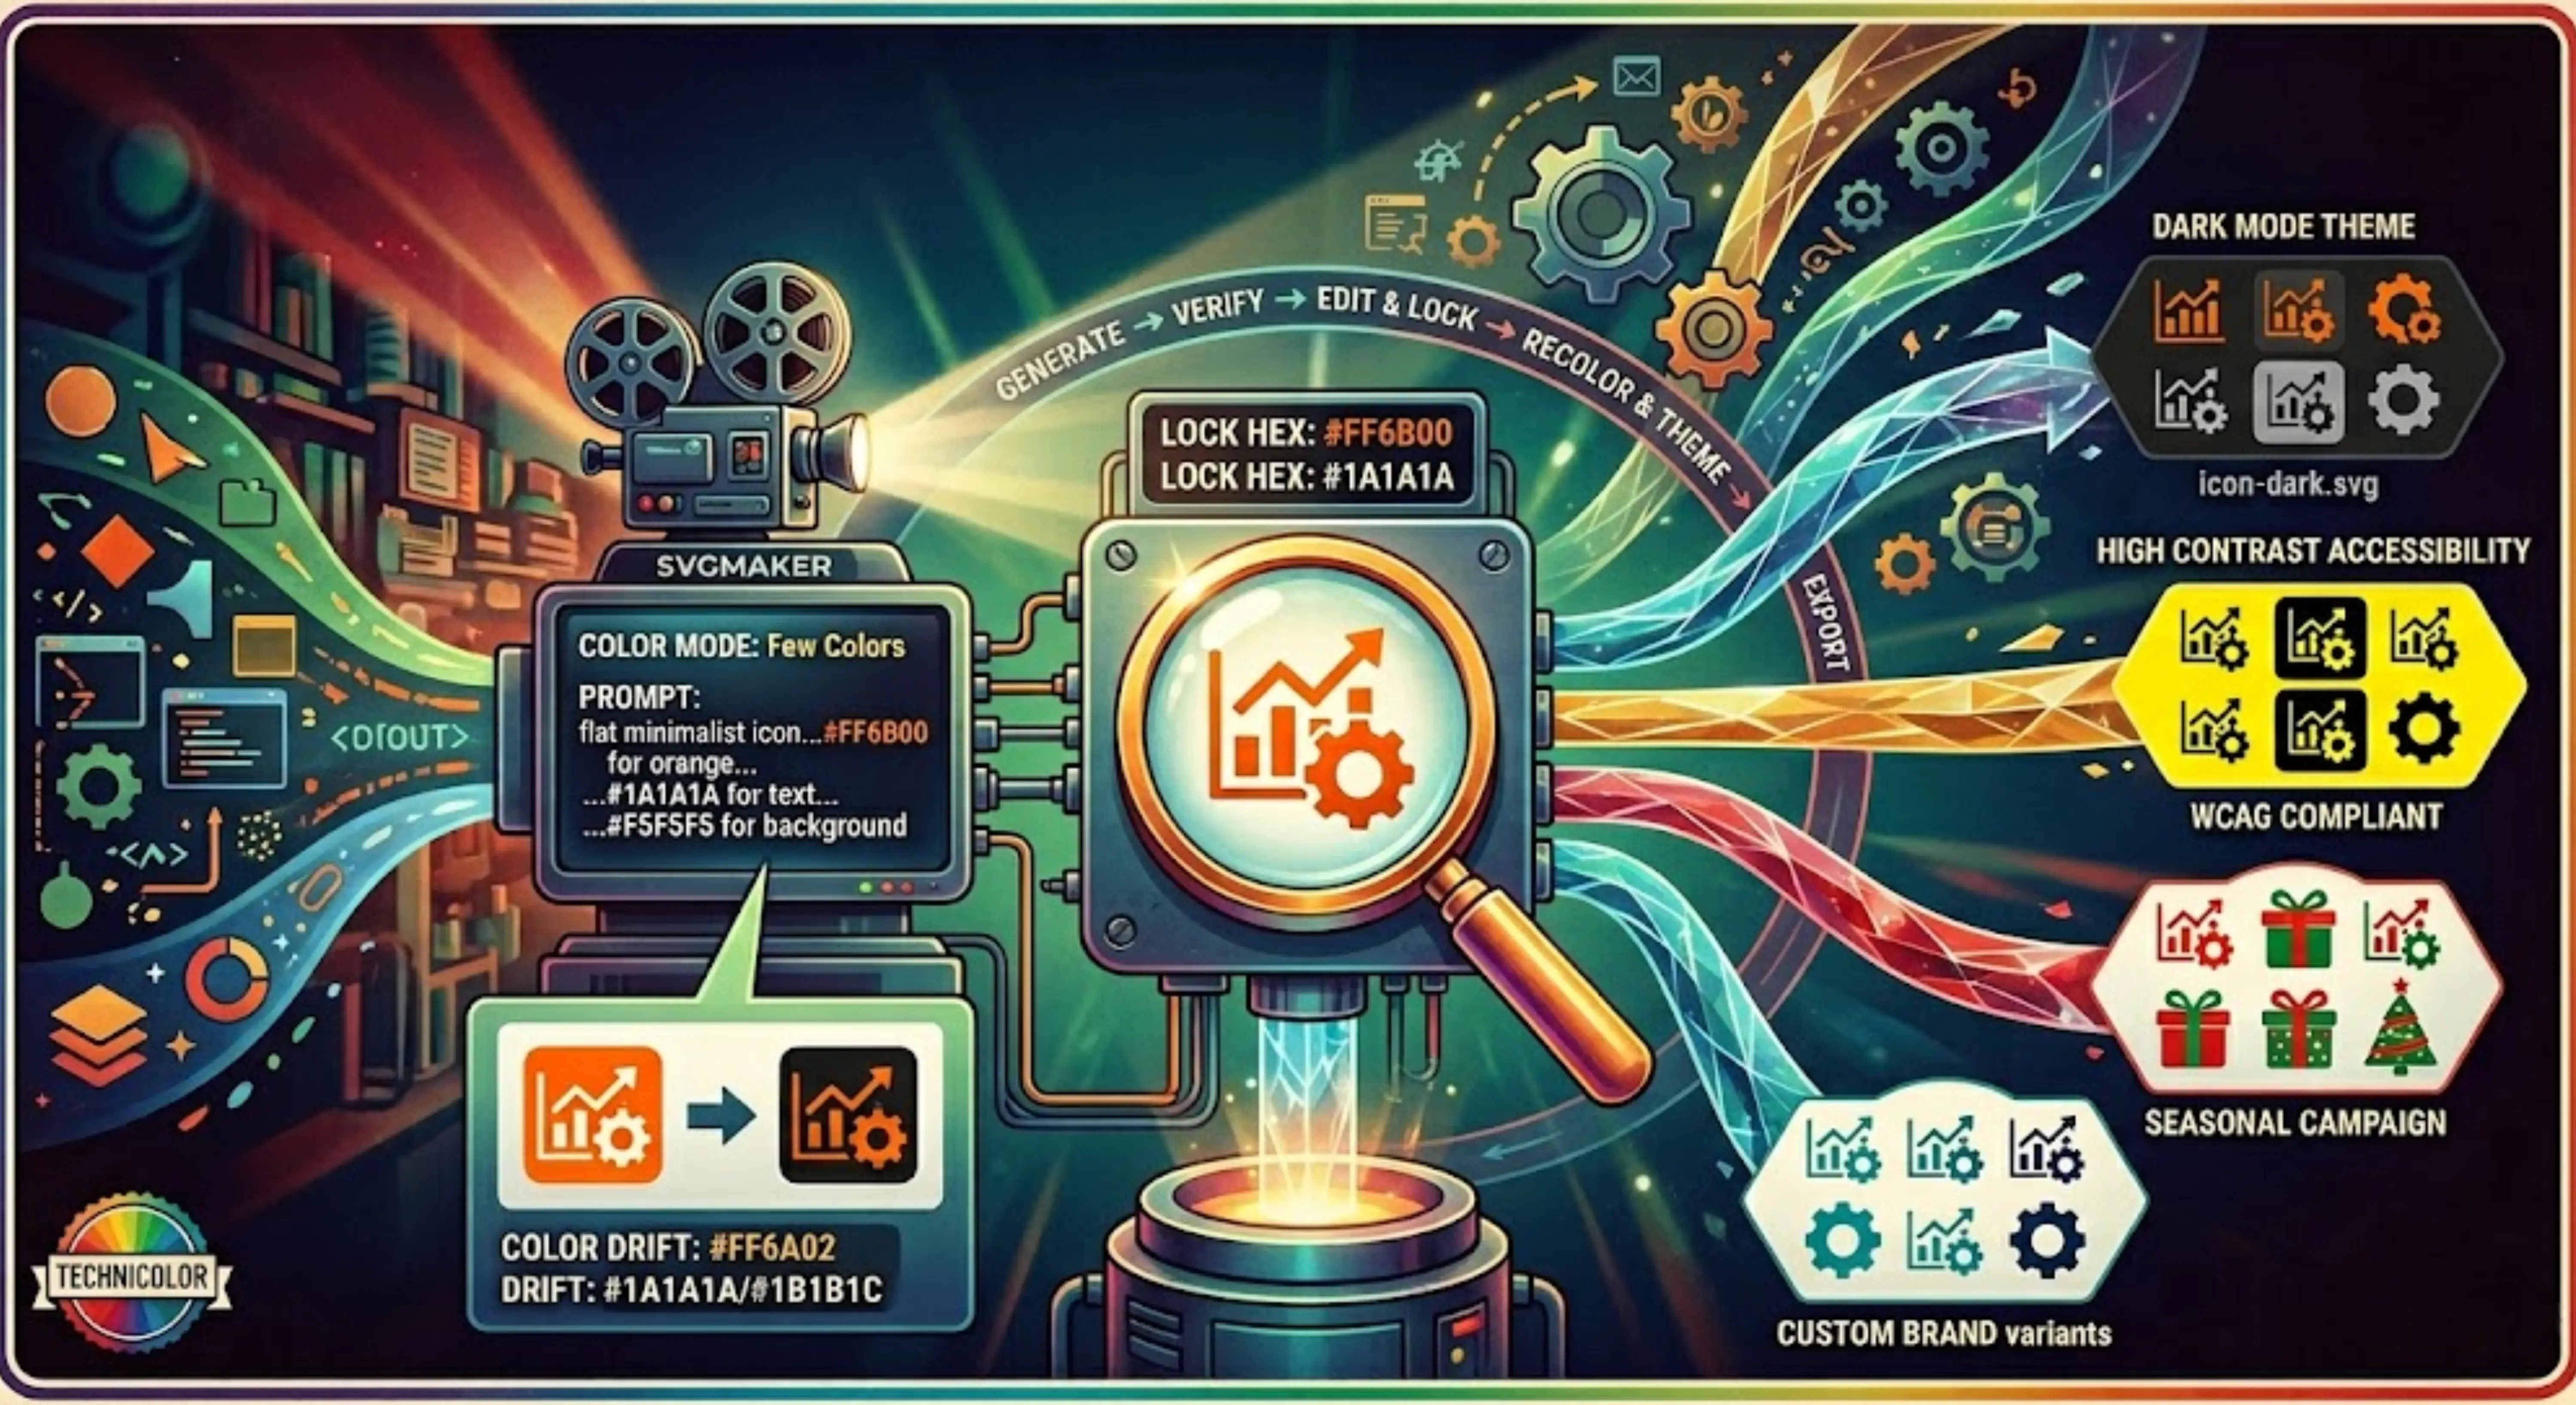
You're a brand designer preparing assets for a product launch. You need 20 vector icons in your exact brand colors — #FF6B00 for the signature orange, #1A1A1A for the primary text, and #F5F5F5 for the clean background. You fire up an AI tool, write a prompt, and the results look fantastic. The shapes are crisp. The style is perfect. But when you zoom in and inspect the hex values, the orange reads #FF6A02 instead of #FF6B00. The dark gray drifts between #1A1A1A, #1B1B1C, and #1C1D1D across different icons. And your client just emailed asking for a dark-mode version of everything by Friday.
This is the frustration that every designer working with AI-generated vectors eventually hits. The problem isn't the AI's ability to generate beautiful SVGs — it's the gap between "close enough" colors and production-ready hex precision. Most generative tools treat color as a suggestion, not a constraint. And when you need to recolor those same assets for multiple themes — light mode, dark mode, seasonal campaigns, co-branded variants — you're stuck regenerating from scratch every time.
In this step-by-step guide, you'll learn a complete visual workflow that solves both problems. You'll discover how to guide the AI toward your exact hex codes during generation, fine-tune any drifted colors after generation, and systematically recolor finished SVGs for as many themes as your project demands. Every step uses the AI SVG generator and SVG Color Editor built into SVGMaker, so you can follow along in your browser without switching between tools.
Why Exact Hex Codes Matter in AI-Generated SVGs
Before diving into workflows, it's worth understanding why this problem exists and why solving it matters more than you might think.
Brand Consistency Starts at the Hex Level
Brand guidelines don't say "use a nice shade of teal." They specify exact hex codes — #00B4D8 for the primary, #023E8A for the secondary, #FFFFFF for the background. Every design token in a modern system, from Figma variables to CSS custom properties, expects these precise values. When an AI-generated SVG delivers #00B3D6 instead of #00B4D8, the discrepancy may look invisible in isolation. But place that icon alongside 30 others on a dashboard, and the inconsistency compounds. Buttons look slightly off-palette. Icons feel like they belong to different brands. The polished, cohesive experience you're building starts to fray at the edges.
This is especially critical for teams working with design systems. A design token that references #00B4D8 won't match an SVG containing #00B3D6 — and automated theming breaks the moment hex values don't align exactly.
The AI Color Drift Problem
AI models don't "look up" your hex code in a database and apply it. They generate colors probabilistically, treating each output as an independent prediction. Ask two separate prompts for "dark navy blue" and you'll likely get #1B2A4A from one and #1C2D4F from the other. Neither is wrong — they're just not deterministic.
Gradients make the problem worse. An AI might correctly anchor the start and end colors of a gradient to your palette but choose intermediate stops that introduce hues you never specified. A gradient that should transition from #FF6B00 to #1A1A1A might pass through an unexpected brownish-red that clashes with your brand.
The solution isn't to avoid AI generation — it's to control color at the input stage and refine it at the output stage. That two-part approach is the foundation of every workflow in this guide.
Guiding the AI Toward Your Exact Colors During Generation
The first step toward color accuracy starts with how you set up and write your generation prompt. While AI models don't have a hex-code input field, you can steer them toward your brand colors through smart prompting and the right settings.
Step 1: Choose Your Color Mode
Navigate to the AI SVG generator and select the Color Mode that best matches your needs. SVGMaker offers options like Full Color, Monochrome, Few Colors, and Auto. For brand-controlled assets, "Few Colors" paired with explicit hex codes in your prompt tends to produce the most palette-disciplined results.
Step 2: Specify Your Colors in the Prompt
This is where precision begins. Instead of writing vague color descriptions like "use orange and dark gray," include your exact hex codes directly in the prompt:
"Create a flat minimalist shopping cart icon using #FF6B00 for the primary color, #1A1A1A for outlines, and #F5F5F5 for the background."
The more specific you are, the closer the AI gets to your target palette. You can also reference your brand by describing the visual feel — "use a warm corporate palette with deep orange and charcoal" — though exact hex codes in the prompt consistently produce tighter color accuracy.
Step 3: Select Your Style and Model
Style presets like Flat, Minimalist, Outline, and Isometric tend to produce cleaner color separation with fewer unexpected gradients, making them ideal for brand-controlled generation. SVGMaker offers 14+ AI models, including Flux 2, GPT-Image-1, and Nano Banana Pro. Different models interpret color instructions with varying degrees of fidelity, so it's worth generating with two or three models to see which produces the most accurate color output for your specific use case.
Generate, Download, and Verify Your SVG
After generation, your SVG appears on the canvas for review. Before downloading, take a moment to verify the colors visually.
Use the background toggle to switch between Light, Dark, and Transparent (checkerboard) views. This is a quick but valuable check — an icon that looks perfectly balanced on a white background may reveal contrast issues on dark, or vice versa. Catching these issues now saves time later.
Once satisfied, download your file as an SVG — a fully editable vector with your hex codes embedded in the markup. If your pipeline requires other formats, SVGMaker also supports SVGZ for compressed delivery, PDF and EPS for print workflows, AI format for professional design tool compatibility, DXF for CAD systems, JSX for React component libraries, and Data URI for inline embedding.
Even with careful prompt engineering, AI output will often drift slightly on individual elements — a gradient stop that's one shade off, or a stroke that defaulted to a slightly different value. That's the nature of generative models, and it's exactly what the next step addresses.
How an SVG Color Editor Helps (And Why You Almost Always Need One)
Generation is step one. Precision is step two. Even when your prompt gets the AI 90% of the way there, the remaining gap is often what separates a draft asset from a production-ready one. This is where the SVG Color Editor becomes indispensable.
Fine-Tune After Generation
Open your generated SVG in the SVG Color Editor. The interface presents every element as a clickable target — tap any shape, path, or text element to select it, then adjust its fill or stroke color using the visual color picker. You can switch between Hex, RGB, and HSL input modes and paste your exact brand hex code to replace any approximate value. Changes render in real time, so you see the corrected color instantly without switching between tools.
Fix Gradients, Strokes, and Multi-Layer Issues
AI-generated gradients are where color drift is most common. The SVG Color Editor includes a dedicated gradient editor that lets you modify linear and radial gradients visually — adjust individual color stops, change opacity values, and modify the gradient direction without touching XML code.
For complex SVGs with many elements sharing the same color, the "Select by color" feature is a major time-saver. Click one shade of blue, and the editor highlights every element in the file that uses that exact value. Change it once, and every instance updates simultaneously. This batch recoloring capability is critical when you're working with icon sets or multi-element illustrations where the same hex appears in dozens of paths.
You can also fix stroke colors independently from fills — a common need when AI generates an icon with matching fill and stroke but your brand guidelines specify different values for each.
Make Your SVG Themeable
The SVG Color Editor automatically extracts all colors used in your file and displays them as an interactive swatch strip. This extraction is more than a convenience feature — it's the foundation for creating theme variants.
By seeing every hex value at a glance, you can systematically plan which colors need to change for a dark mode version, which need higher contrast for an accessibility variant, and which should swap for a seasonal campaign palette. For designers building design systems, this color extraction is invaluable for documenting exactly which hex values are in use across an icon set and ensuring consistency.
For additional visual refinement, the SVG Editor offers tools like the Magic Eraser for removing unwanted elements and layer management for complex multi-part illustrations. To understand why AI sometimes generates imprecise color values in the first place, our guide on precision challenges in AI-generated SVG code provides a detailed technical explanation.
The Complete Workflow: Generate → Edit → Recolor → Export
Now that you understand each tool individually, here's the full workflow assembled into a repeatable pipeline. This is the process you'll use whether you're creating a single icon or an entire brand asset library.
- Guide the AI with your palette. On the AI SVG generator, select your Color Mode and write a prompt that includes your exact hex codes (e.g., "use #FF6B00, #1A1A1A, and #F5F5F5"). Choose a style preset that favors clean color separation.
- Prompt and generate. Write your prompt, select a style preset (Flat, Minimalist, Outline, Isometric, or others), choose your AI model, and generate. The more specific your color instructions, the closer the AI's output.
- Review on canvas. Toggle between Light, Dark, and Transparent backgrounds to spot-check the SVG in different contexts. Zoom in to verify details, color boundaries, and gradient transitions.
- Open in the SVG Color Editor. Fine-tune any colors that drifted from your exact hex codes. Use the batch "Select by color" feature to fix all instances of a drifted shade in one click. Adjust gradient stops if needed. The SVG Color Editor makes this fast and visual.
- Refine visually. For further adjustments — removing unwanted elements with the Magic Eraser, managing layers in complex illustrations, or making targeted edits — use the SVG Editor. You can also use the SVG Editor with AI Assistance to make AI-powered modifications to your image.
- Export. Download your production-ready SVG. Choose from SVG, SVGZ, PDF, EPS, AI, DXF, JSX, or Data URI depending on your target platform.
This six-step pipeline treats generation and color calibration as separate, sequential concerns — which is exactly how professional design workflows operate. The AI handles the heavy lifting of shape and composition; the SVG Color Editor ensures pixel-perfect hex accuracy. For teams using SVGMaker's professional-grade advanced editing tools, steps 4 and 5 can include path editing, boolean operations, and layer management for even deeper refinement.
Recoloring for Multiple Themes: A Step-by-Step Guide
You've generated and color-perfected one version of your SVG. Now the project requires three more: a dark mode variant, a high-contrast accessibility version, and a holiday campaign palette. Here's how to produce all of them without regenerating a single asset.
Light Theme to Dark Theme
Open your finalized SVG in the SVG Color Editor. The editor extracts all colors as a swatch strip, giving you a complete inventory of every hex value in the file.
Swap colors systematically: light backgrounds (#F5F5F5) become dark backgrounds (#1A1A1A), and dark foreground elements become light foreground elements. Use the "Select by color" batch feature to change every instance of a specific hex value simultaneously — far faster than editing element by element.
Toggle the editor's background to Dark mode to preview your variant in the context it will actually be used. When the dark version looks right, export it as a separate file (for example, icon-dark.svg). Your original light-mode file remains untouched.
Creating a High-Contrast Accessibility Variant
Accessibility isn't optional — it's a requirement for many organizations and a best practice for all. WCAG 2.1 guidelines require a minimum contrast ratio of 4.5:1 for normal text and UI elements, and 3:1 for large elements.
In the SVG Color Editor, review each color pairing in your SVG. Adjust foreground colors against their backgrounds to meet or exceed these contrast thresholds. This is especially important for data visualization SVGs where color-coding conveys meaning — a chart where "at risk" red and "on track" green are indistinguishable to colorblind users isn't just inaccessible, it's misleading. Save this version as your high-contrast variant.
Custom Brand Themes and Seasonal Variants
The same recoloring process works for any palette swap. Creating a co-branded version for a partner? Swap your primary hex codes for theirs. Launching a holiday campaign? Replace your standard palette with seasonal colors — warm reds and greens for the holidays, pastels for spring, rich oranges for autumn.
Save your theme palettes so you can apply them to future SVGs instantly, building a reusable library of color schemes. For teams building design systems, consider using currentColor for monochromatic SVG icons — this allows the icon to automatically inherit the text color of its parent container, making light-to-dark theming effortless. CSS custom properties offer even more flexibility, letting you define color tokens once and apply them across hundreds of SVGs.
For bulk recoloring across multiple files, the SVG Color Editor streamlines the process — open each SVG, use "Select by color" to batch-swap hex values, and export. This is significantly faster than manual element-by-element editing when you're working with asset sets of 20 or more.
Export and Integrate: From SVGMaker to Your Design Tool
The best color workflow means nothing if the finished SVGs don't integrate seamlessly into your production pipeline. SVGMaker is built for exactly this.
Export Formats for Every Pipeline
Your target platform determines your export format:
| Format | Best For |
|---|---|
| SVG | Web applications, design systems, UI components |
| SVGZ | Compressed web delivery (smaller file size) |
| PDF / EPS / AI | Print workflows, packaging, physical media |
| DXF | CAD systems, manufacturing, laser cutting |
| JSX | React and React Native component libraries |
| Data URI | Inline embedding in CSS or HTML |
Before exporting, consider running your SVG through the SVG Code Editor for a final optimization pass. Powered by SVGO, it strips unnecessary metadata, rounds decimal-heavy coordinates, and minifies the file — reducing load times without affecting visual quality.
Figma Plugin Integration
For teams that live in Figma, SVGMaker's Figma Plugin brings the entire workflow inside the design canvas. Generate SVGs from prompts, apply color edits, and insert the finished vectors directly onto your Figma frames — all without leaving the application.
The plugin includes selection detection: select an existing raster image on your canvas, and the plugin offers to convert it to SVG. Select a vector path, and it offers AI-powered editing. This contextual awareness eliminates the import/export friction that slows down multi-tool workflows. For a deeper comparison of Figma SVG export options, read our guide on which Figma plugin exports the cleanest SVG files.
Real-World Use Cases
The workflows above aren't theoretical — they map directly to everyday design challenges across industries. Here's how five common scenarios play out.
1. Brand Identity Systems (Logos, Icons, Brand Kits)
You're managing a brand with 40+ icons across web, mobile, and print. By specifying your exact hex codes in each prompt, you generate the entire icon set in a single session. After generation, run each SVG through the SVG Color Editor to verify and lock down exact color values. When the company launches a sub-brand, you recolor the full set for the new palette in minutes instead of hours. SVGMaker's AI icon generator is purpose-built for this kind of batch icon creation. For platform-specific requirements, our tutorial on creating consistent SVG app icons for iOS and Android covers export rules for both ecosystems.
2. UX/UI Design Systems & Theming
Your design system supports light, dark, and high-contrast modes. Instead of maintaining three separate icon libraries, you generate once with your base palette and recolor twice using the SVG Color Editor. Use the AI SVG Editor for visual fine-tuning of individual elements across each theme set. The result is three production-ready theme variants with guaranteed hex consistency — no manual re-tracing, no asset duplication, and no risk of color drift between modes.
3. Data Visualization
Dashboard charts rely on color-coding to convey meaning: green for on-track, amber for at-risk, red for critical. Using exact hex codes ensures your data palette is both visually consistent and WCAG-compliant across every chart. When a client requests a white-labeled version, you swap the palette in the SVG Color Editor and export — the chart structure stays intact, only the colors change.
4. Marketing Creatives & Campaign Variants
One hero illustration, five seasonal campaigns. You generate the base SVG with your standard brand palette, then use the SVG Color Editor to produce Valentine's (pinks and reds), Summer (teals and yellows), Halloween (oranges and blacks), Holiday (reds and greens), and neutral variants. Each takes minutes. Without a recoloring workflow, you'd be regenerating — and re-editing — the same illustration five times.
5. Print-on-Demand & Vector Production
T-shirt and merchandise designs demand exact Pantone-to-hex conversions for accurate print reproduction. You generate vector artwork with precise hex codes, fine-tune in the SVG Color Editor, and export as SVG, EPS, or AI for your print pipeline. If you're working with legacy raster artwork that needs to join the vector pipeline, SVGMaker's SVG converter traces and transforms PNG or JPG files into clean, editable SVG vectors.
Frequently Asked Questions
1. How do I get the AI to use my exact brand hex codes?
Include your hex codes directly in the generation prompt — for example, "create a flat icon using #FF6B00 and #1A1A1A." Set the Color Mode to "Few Colors" for tighter palette control. After generation, open the SVG in the SVG Color Editor to verify and correct any values that drifted.
2. What if the AI generates colors that don't match my hex codes exactly?
Open the SVG in the SVG Color Editor. Click any element, paste your correct hex code, and the color updates instantly. For SVGs where the same off-color appears in multiple elements, use the "Select by color" feature to batch-fix every instance in one click.
3. How do I recolor an SVG for dark mode without regenerating it?
Open the SVG in the SVG Color Editor. The tool extracts all colors as a swatch strip. Swap your light background values for dark ones and your dark foreground values for light ones. Toggle the Dark background to preview the result in context. Export as a separate file — your original light-mode SVG remains unchanged.
4. Can I extract colors from an existing SVG automatically?
Yes. When you open any SVG in the SVG Color Editor, it automatically extracts every color in the file and displays them as an interactive swatch strip. You can also use the AI Palette feature to generate harmonious color suggestions based on the SVG's existing colors. For more on handling AI color output, see our guide on cleaning up AI-generated SVG files.
5. Does SVGMaker work with Figma?
Yes. SVGMaker's Figma Plugin lets you generate, edit, and insert SVGs directly onto the Figma canvas. Colors and edits sync seamlessly between the web app and the plugin. The plugin also detects your current selection — offering AI editing for vectors and SVG conversion for raster images.
6. What export formats does SVGMaker support?
SVGMaker supports SVG, SVGZ, PDF, EPS, AI, DXF, JSX (for React and React Native), and Data URI. For web use, SVG is recommended for maximum flexibility. For print production, PDF, EPS, or AI are standard. For developer workflows, JSX exports production-ready React components. All formats preserve the exact hex codes you set during the editing process.
Conclusion
The gap between "AI-generated" and "production-ready" comes down to color control. With the right workflow, that gap closes entirely.
The approach is straightforward: Guide the AI toward your exact hex codes through smart prompting and color mode selection. Refine any drifted colors after generation using the SVG Color Editor. Recolor for every theme your project demands — light, dark, high-contrast, seasonal, co-branded — without regenerating a single asset.
This isn't a workaround. It's a professional pipeline that scales from a single icon to an entire brand system, saving hours of manual color correction and eliminating the guesswork that comes with AI-generated color output.
Start with SVGMaker's AI SVG generator and see how precise your next vector can be.
For more on optimizing your SVG workflow, explore our guides on optimizing AI-generated SVGs for faster render times, SVG optimization techniques, and optimizing SVGs for speed and performance.